Web Design
HTML
As told earlier, HTML is a markup language and makes use of various tags to format the content. These tags are enclosed within angle braces <Tag Name> . Except few tags, most of the tags have their corresponding closing tags. For example, <html> has its closing tag </html> and <body> tag has its closing tag </body> tag etc. Above example of HTML document uses the following tags:
Tag | Description |
---|---|
<!DOCTYPE...> | This tag defines the document type and HTML version. |
<html> | This tag encloses the complete HTML document and mainly comprises of document header which is represented by <head>...</head> and document body which is represented by <body>...</body> tags. |
<head> | This tag represents the document's header which can keep other HTML tags like <title>, <link> etc. |
<title> | The <title> tag is used inside the <head> tag to mention the document title. |
<body> | This tag represents the document's body which keeps other HTML tags like <h1>, <div>, <p> etc. |
<h1> | This tag represents the heading. |
<h1> | This tag represents a paragraph. |
To learn HTML, you will need to study various tags and understand how they behave, while formatting a textual document. Learning HTML is simple as users have to learn the usage of different tags in order to format the text or images to make a beautiful webpage. World Wide Web Consortium (W3C) recommends to use lowercase tags starting from HTML 4.
A typical HTML document will have the following structure:
We will study all the header and body tags in subsequent chapters, but for now let's see what is document declaration tag.
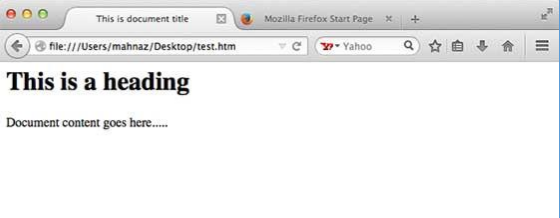
This will produce the following result:
The <p> tag offers a way to structure your text into different paragraphs. Each paragraph of text should go in between an opening <p> and a closing &al;/p> tag as shown below in the example:
This will produce the following result:
Whenever you use the <br /> element, anything following it starts from the next line. This tag is an example of an empty element, where you do not need opening and closing tags, as there is nothing to go in between them.
The <br /> tag has a space between the characters br and the forward slash. If you omit this space, older browsers will have trouble rendering the line break, while if you miss the forward slash character and just use <br> it is not valid in XHTML.
This will produce the following result:
You can use <center> tag to put any content in the center of the page or any table cell.
This will produce the following result: This text is not in the center.
This text is in the center.
Horizontal lines are used to visually break-up sections of a document. The <hr> tag creates a line from the current position in the document to the right margin and breaks the line accordingly. For example, you may want to give a line between two paragraphs as in the given example below:
This will produce the following result: This is paragraph one and should be on top
This is paragraph two and should be at bottom.
Again <hr /> tag is an example of the empty element, where you do not need opening and closing tags, as there is nothing to go in between them.
The <hr /> element has a space between the characters hr and the forward slash. If you omit this space, older browsers will have trouble rendering the horizontal line, while if you miss the forward slash character and just use <hr> it is not valid in XHTML
Sometimes, you want your text to follow the exact format of how it is written in the HTML document. In these cases, you can use the preformatted tag <pre>.
Any text between the opening <pre> tag and the closing </pre> tag will preserve the formatting of the source document.
This will produce the following result:
function testFunction( strText ){
alert (strText)
}
Try using the same code without keeping it inside <pre>...</pre> tag
Suppose you want to use the phrase "12 Angry Men." Here, you would not want a browser to split the "12, Angry" and "Men" across two lines:
An example of this technique appears in the movie "12 Angry Men."
In cases, where you do not want the client browser to break text, you should use a nonbreaking space entity instead of a normal space. For example, when coding the "12 Angry Men" in a paragraph, you should use something similar to the following code:
An HTML element is defined by a starting tag. If the element contains other content, it ends with a closing tag, where the element name is preceded by a forward slash as shown below with few tags:
Start Tag | Content | End Tag |
---|---|---|
<p> | This is paragraph content. | <p/> |
<h1> | This is heading content. | <h1/> |
<div> | This is division content. | <div/> |
<b/> | Swanson |
So here <p>....</p> is an HTML element, <h1>...</h1> is another HTML element. There are some HTML elements which don't need to be closed, such as <img.../>, <hr /> and <br /> elements. These are known as void elements.
HTML documents consists of a tree of these elements and they specify how HTML documents should be built, and what kind of content should be placed in what part of an HTML document.
n HTML element is defined by a starting tag. If the element contains other content, it ends with a closing tag.
For example, <p> is starting tag of a paragraph and </p> is closing tag of the same paragraph but <p>This is paragraph</p> is a paragraph element.
It is very much allowed to keep one HTML element inside another HTML element:
This will display the following result:
This is underlined paragraph
We have seen few HTML tags and their usage like heading tags <h1>, <h2>, paragraph tag <p> and other tags. We used them so far in their simplest form, but most of the HTML tags can also have attributes, which are extra bits of information.
An attribute is used to define the characteristics of an HTML element and is placed inside the element's opening tag. All attributes are made up of two parts: a name and a value:
Attribute names and attribute values are case-insensitive. However, the World Wide Web Consortium (W3C) recommends lowercase attributes/attribute values in their HTML 4 recommendation.
This will display the following result:
This is left aligned
This is center aligned
This is right aligned
The four core attributes that can be used on the majority of HTML elements (although not all) are:
The id attribute of an HTML tag can be used to uniquely identify any element within an HTML page. There are two primary reasons that you might want to use an id attribute on an element:
We will discuss style sheet in separate tutorial. For now, let's use the id attribute to distinguish between two paragraph elements as shown below.
The title attribute gives a suggested title for the element. They syntax for the title attribute is similar as explained for id attribute: The behavior of this attribute will depend upon the element that carries it, although it is often displayed as a tooltip when cursor comes over the element or while the element is loading.
This will produce the following result:
Now try to bring your cursor over "Titled Heading Tag Example" and you will see that whatever title you used in your code is coming out as a tooltip of the cursor.
The class attribute is used to associate an element with a style sheet, and specifies the class of element. You will learn more about the use of the class attribute when you will learn Cascading Style Sheet (CSS). So for now you can avoid it. The value of the attribute may also be a space-separated list of class names. For example:
class="className1 className2 className3"
The style attribute allows you to specify Cascading Style Sheet (CSS) rules within the element.
This will produce the following result:
Some text...
At this point of time, we are not learning CSS, so just let's proceed without bothering much about CSS. Here, you need to understand what are HTML attributes and how they can be used while formatting content.
There are three internationalization attributes, which are available for most (although not all) XHTML elements.
The dir attribute allows you to indicate to the browser about the direction in which the text should flow. The dir attribute can take one of two values, as you can see in the table that follows:
Value | Meaning |
---|---|
ltr | Left to right (the default value) |
rtl | Right to left (for languages such as Hebrew or Arabic that are read right to left) |
This will produce the following result:
This is how IE 5 renders right-to-left directed text.
When dir attribute is used within the <html> tag, it determines how text will be presented within the entire document. When used within another tag, it controls the text's direction for just the content of that tag.
The lang attribute allows you to indicate the main language used in a document, but this attribute was kept in HTML only for backwards compatibility with earlier versions of HTML. This attribute has been replaced by the xml:lang attribute in new XHTML documents.
The values of the lang attribute are ISO-639 standard two-character language codes.
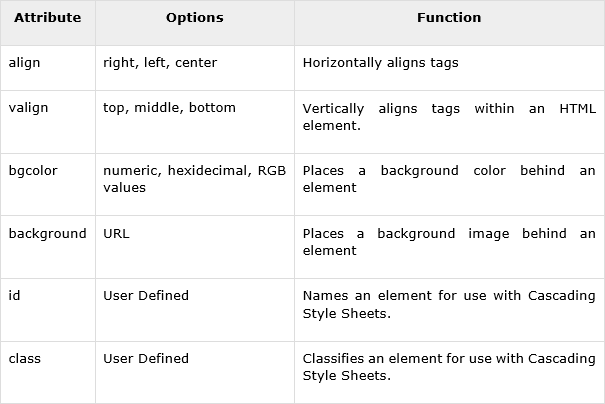
Here's a table of some other attributes that are readily usable with many of the HTML tags.
The
<body>
tag has two attributes where you can specify
backgrounds. The background can be a color
or an image.
The bgcolor attribute specifies a back
ground-color for an HTML page. Th
e value of this attribute can be
a hexadecimal number, an RGB value, or a color name:
<body bgcolor="#000000">
<body bgcolor="rgb(0,0,0)">
<body bgcolor="black">
The lines above all set the background-color to black.
The background attribute can also specify a backgr ound-image for an HTML page. The value of this attribute is the URL of the image you want to use. If the image is smaller than the browser window, the image will repeat itself until it fills the entire browser window.
<body background="clouds.gif" > <body background=" .austincc.edu/html/graphics/clouds.gif">The URL can be relative (as in the first line above) or absolute (as in the second line above). If you want to use a background image, you should keep in mind:
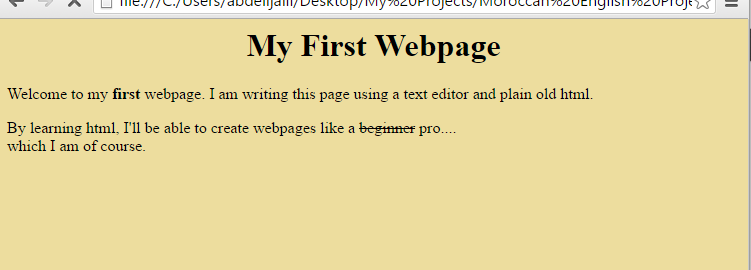
Open your text editor and type the following text:
Save your page as mypage.html and view it in your browser. Result :
Colors are defined using a hexadecimal notation fo r the combination of red, green, and blue color values (RGB). The lowest value that can be given to one light source is 0 (h ex #00). The highest value is 255 (hex #FF). This tabl e shows the result of comb ining red, green, and blue:
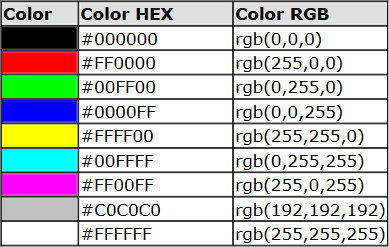
Note: Only 16 color names are supported by the W3C HTML 4.0 standard (aqua, black, blue, fuchsia, gray, green, lime, maroon, navy, olive, pu rple, red, silver, teal, white, and yellow). For all other colors you should use the Color HEX value.
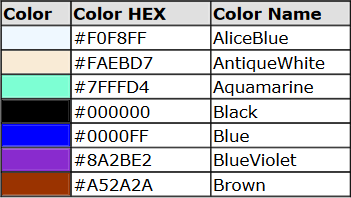
A few years ago, when most computers supported only 256 different colors, a list of 216 Web Safe Colors was suggested as a Web standard. The reason for this was that the Microsoft and Mac operating system used 40 different "reserved" fixed system colors (about 20 ea ch). This 216 cross platform web safe color palette was originally created to ensure that all computers would display all colors correctly when running a 256 color palette.
The combination of Red, Green and Blue values from 0 to 255 gives a total of more than 16 million different colors to play with ( 256 x 256 x 256). Most modern monito rs are capable of displaying at least 16,384 different colors.
An unordered list is a list of items marked with bullets
(typically small black circles). An unordered list
starts with the
<ul>
tag. Each list item starts with the
<li>
tag.
This Code | Would Display |
---|---|
<ul> <li>Coffee</li> <li>Milk</li> </ul> |
|
An ordered list is also a list of items. The list items are marked with numbers. An ordered list starts
with the <ol> tag. Each list item starts with the <li> tag.
This Code | Would Display |
---|---|
<ol> <li>Coffee</li> <li>Milk</li> </ol> |
|
Inside a list item you can put paragraphs, line breaks, images, links, other lists, etc.
Definition lists consist of two parts: a term and a description. To mark up a definition list, you need three HTML elements; a container <dl>, a definition term <dt>, and a definition description <dd>.
This Code | Would Display |
---|---|
<dl> <dt>Cascading Style Sheets</dt> <dd>Style sheets are used to provide presentational suggestions for documents marked up in HTML. </dd> </dl> |
|
Inside a definition-list definition (the <dd> tag) you ca put paragraphs, line breaks, images, links, other lists, etc
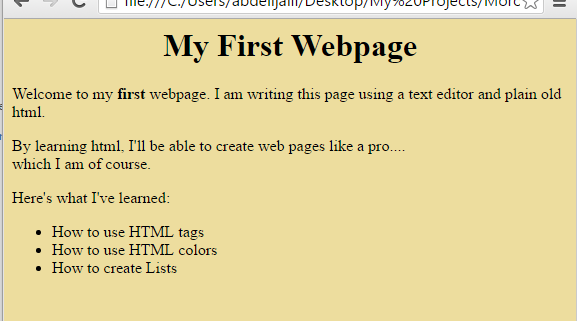
Open your text editor and type the following:
Save your page as mypage1.html and view it in your browser.
Result:
HTML uses the <a> anchor tag to create a link to another document or web page.
An anchor can point to any resource on the Web: an HTML page, an image, a sound file, a movie, etc. The syntax of crea ting an anchor:
<a href="url">Text to be displayed</a>
The <a> tag is used to create an anchor to link from, the href attribute is used to tell the address of the document or page we are linking to, and the words between the open and close of the anchor tag will be displayed as a hyperlink.
This Code | Would Display |
---|---|
<a href=" fb.com/">Visit fb!</a> | Visit fb! |
With the target attribute, you can define where the linked document will be opened. By default, the link will open in the current window. The code below will open the document in a new browser window:
<a href=
target="_blank"
>Visit google!</a>
To create an email link, you will use mailto: plus your email address. Here is an example
<a href="mailto: "
>Email Help Desk</a>
Result:Email Help Desk
To add a subject for the email message, you would add ?subject= after the email address. For example:
<a href="mailto:
?subject=Email Assistance
">Email Help Desk</a>
The name attribute is used to create a named anch or. When using named anchors we can create links that can jump directly to a specific section on a page , instead of letting the user scroll around to find what he/she is looking for. Unlike an anchor th at uses href, a named anchor doesn't change the appearance of the text (unless you set styles for th at anchor) or indicate in any way that there is anything special about the text. Below is the syntax of a named anchor:
<a name="top">Text to be displayed</a>
To link directly to the top section, add a # sign an d the name of the anchor to the end of a URL, like this:
The <img> tag is empty, which means that it contains attributes only and it has no closing tag. To display an image on a page, you need to use the sr c attribute. Src stands fo r "source". The value of the src attribute is the URL of the image you want to display on your page. The syntax of defining an image:
This Code | Would Display |
---|---|
<img src="graphics/chef .gif"> |
Not only does the source attribute specify what im age to use, but where th e image is located. The above image, graphics/chef.gif , means that the browser will look for the image name chef.gif in a graphics folder in the same folder as the html document itself.
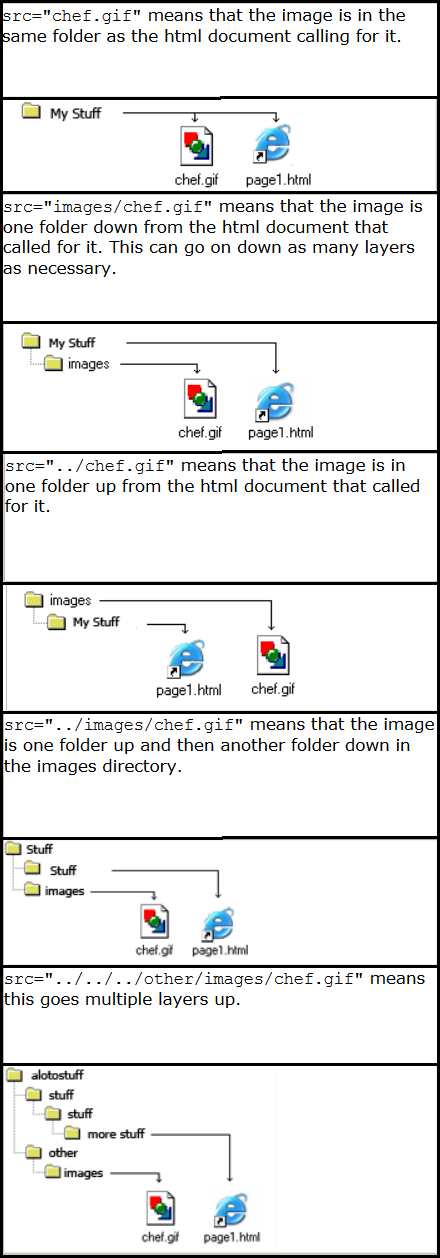
The browser puts the image where the image tag occurs in the document. If you put an image tag between two paragraphs, the browser shows the first paragraph, then the imag e, and then the second paragraph.
The alt attribute is used to define an alternate te xt for an image. The value of the alt attribute is author-defined text:
<img src="graphics/chef.gif"
alt="Smiling Happy Chef ">
The alt attribute tells the reader what he or she is missing on a page if the browser can't load images. The browser will then display the alternate text instead of the image. It is a good practice to include the alt attribute for each image on a page, to impr ove the display and usefulness of your document for people who have text-only brow sers or use screen readers.
When you have an image, the browser usually figures out how big the image is all by itself. If you put in the image dimensions in pixels however, the browser simply reserves a sp ace for the image, then loads the rest of the page. Once the entire page is loads it can go back and fill in the images. Without dimensions, when it runs into an image, the brow ser has to pause loading the page, load the image, then continue loading the page. The chef image would then be:
<img src="graphics/chef.gif"
width="130" height="101"
alt="Smiling Happy Chef">
Open the file mypage1.html in your text editor and add code highlighted in bold:
Save your page as mypage5.html and view it in your browser.
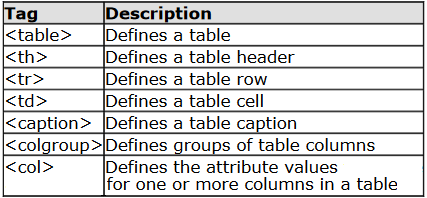
Tables are defined with the <table> tag. A table is divided into rows (with the <tr> tag), and each row is divided into data cells (with the <td> tag). The letters td stands for table data, which is the content of a data cell. A data cell can contain text, images, lists, paragraphs, forms, horizontal rules, tables, etc.
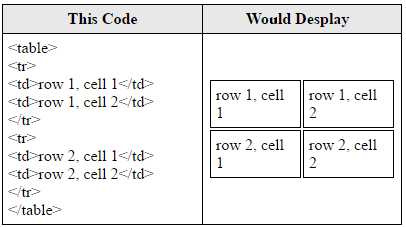
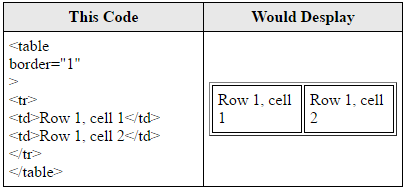
To display a table with borders, you will use the border attribute.
Open up your text editor. Type in your <html>, <head> and <body> tags. From here on I will only be writing what goes between the <body> tags. Type in the following:
Save your page as mytable1.html and view it in your browser.
Headings in a table are defined with the <th> tag.
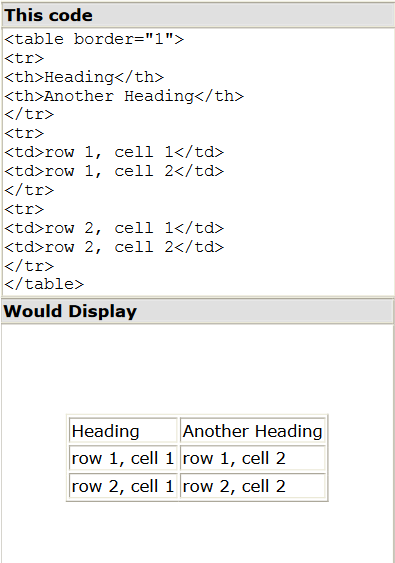
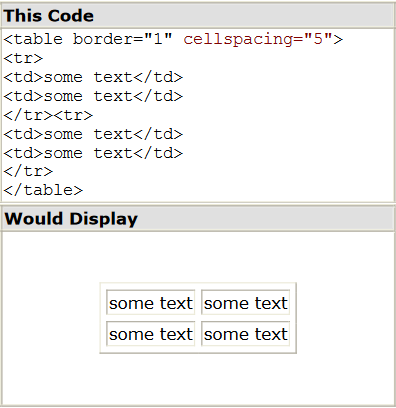
The <table> tag has two attributes known as cellspacing and cellpadding. Here is a table example without these properties. These properties may be used separately or together.
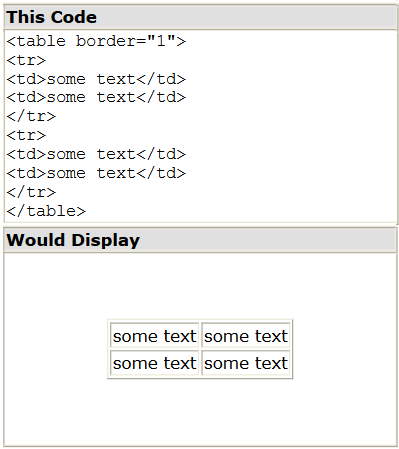
Cellspacing is the pixel width between the individual data ce lls in the table (The thickness of the lines making the table grid). The default is zero. If the border is set at 0, the cellspacing lines will be invisible.
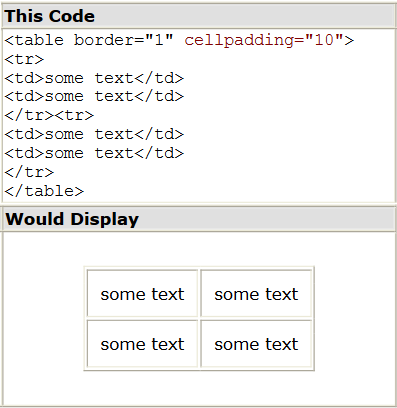
Cellpadding is the pixel space between the cell co ntents and the cell border. The default for this property is also zero. This feature is not used often, but sometimes comes in handy when you have your borders turned on and you want the contents to be away from the border a bit for easy viewing. Cellpadding is invisible, even with the border property turned on. Ce llpadding can be handled in a style sheet.
The width attribute can be used to define the width of your table. It can be de fined as a fixed width or a relative width. A fixed table width is one where the width of the table is specified in pixels. For example, this code, <table width="550">, will produce a table that is 550 pixels wide. A relative table width is specified as a percentage of the width of the visitor's viewing window. Hence this code, <table width="80%"> , will produce a table that occupies 80 percent of the screen.
There are arguments in favor of giving your tables a relative width because such table widths yield pages that work regardless of the visitor's screen resolution. For example, a table width of 100% will always span the entire width of the browser window whether the visitor has a 800x600 display or a 1024x768 display (etc). Your visitor never needs to scroll horizontally to read your page, something that is regarded by most peop le as being very annoying.
Let's put everything you've learned together to crea te a simple page. Open your text editor and type the following text:
Save your page as my ta ble2.html and view it in your browser.
I have indented some of the HTML code in the above example. Indenting the code can make your HTML document easier to read.
Forms are used to collect data inputted by a user. They can be used as an interface for a web application, for example, or to send data across the web.
form defines the form and within this tag, if you are using a form for a user to submit information (which we are assuming at this level), an action attribute is needed to tell the form where its contents will be sent to. The method attribute tells the form how the data in it is going to be sent and it can have the value get, which is default, and latches the form information onto a web address, or post, which (essentially) invisibly sends the form’s information.
So a form element will look something like this
The input tag is the daddy of the form world. It can take a multitude of guises, the most common of which are outlined below
textarea is, basically, a large, multi-line textbox. The anticipated number of rows and columns can be defined with rows and cols attributes, although you can manipulate the size to your heart’s content using CSS.
Any text you choose to place between the opening and closing tags (in this case “a big load of text”) will form the initial value of the text area.
The select tag works with the option tag to make drop-down select boxes.
When the form is submitted, the value of the selected option will be sent. This value will be the text between the selected opening and closing option tag unless an explicit value is specified with the value attribute, in which case this will be sent instead. So, in the above example, if the first item is selected, “Option 1” will be sent, if the third item is selected, “third option” will be sent.
Similar to the checked attribute of checkboxes and radio buttons, an option tag can also have a selected attribute, to start off with one of the items already being selected, eg. <option selected>Rodent</option> would pre-select “Rodent” from the items.
All of the tags mentioned above will look very nice presented on the page but if you hook up your form to a form-handling script, they will all be ignored. This is because the form fields need names. So to all of the fields, the attribute name needs to be added, for example <input type="text" name="talkingsponge">.
A contact form for Noah’s Ark, for example, might look something like the one below. (Note: this form will not work unless there is a “contactus.php” file, which is stated in the action attribute of the form tag, to handle the submitted data).
It’s time to create your own page. Use your text editor to create a page which contains the following:
ave the file as xyht ml_bas ics.html where xy is your initials. Email the file to
CSS
A CSS (cascading style sheet) file allows you to separate your web sites (X)HTML content from it's style. As always you use your (X)HTML file to arrange the content, but all of the presentation (fonts, colors, background, borders, text formatting, link effects & so on...) are accomplished within a CSS. At this point you have some choices of how to use the CSS, either internally or externally.
First we will explore the internal method. This way you are simply placing the CSS code within the <head></head> tags of each (X)HTML file you want to style with the CSS. The format for this is shown in the example below
With this method each (X)HTML file contains the CSS code needed to style the page. Meaning that any changes you want to make to one page, will have to be made to all. This method can be good if you need to style only one page, or if you want different pages to have varying styles.
Next we will explore the external method. An external CSS file can be created with any text or HTML editor such as "Notepad" or "Dreamweaver". A CSS file contains no (X)HTML, only CSS. You simply save it with the .css file extension. You can link to the file externally by placing one of the following links in the head section of every (X)HTML file you want to style with the CSS file.
Or you can also use the @import method as shown below
Either of these methods are achieved by placing one or the other in the head section as shown in example below.
By using an external style sheet, all of your (X)HTML files link to one CSS file in order to style the pages. This means, that if you need to alter the design of all your pages, you only need to edit one .css file to make global changes to your entire website. Here are a few reasons this is better.
In the previous paragraphs, I have explained how to link to a css file either internally or externally. If you understood, than I am doing a good job. If not don't fret, there is a long way to go before we are finished. Assuming you have caught on already, you are probably asking, well can I do both? The answer is yes. You can have both internal, external, and now wait a minute a third way? Yes inline styles also.
I have not mentioned them until now because in a way they defeat the purpose of using CSS in the first place. Inline styles are defined right in the (X)HTML file along side the element you want to style. See example below.
Some red text
Some red text
Inline styles will NOT allow the user to change styles of elements or text formatted this way
As far as which way is better, it depends on what you want to do. If you have only one file to style then placing it within the <head></head> tags (internal) will work fine. Though if you are planning on styling multiple files then the external file method is the way to go.
Choosing between the <link related=> & the @import methods are completely up to you. I will mention that the @import method may take a second longer to read the CSS file in Internet Explorer than the <link related=> option
The use of external style sheets also can benefit users that suffer from disabilities. For instance, a user can turn off your stylesheet or substitute one of there own to increase text size, change colors and so on
Swapping stylesheets is beneficial not only for users with disabilities, but also power users who are particular about how they read Web documents.
You will discover as you delve farther into the world of CSS that all browsers are not created equally, to say the least. CSS can and will render differently in various browsers causing numerous headaches.
The syntax for CSS is different than that of (X)HTML markup. Though it is not too confusing, once you take a look at it. It consists of only 3 parts.
selector { property: value }The selector is the (X)HTML element that you want to style. The property is the actual property title, and the value is the style you apply to that property. Each selector can have multiple properties, and each property within that selector can have independent values. The property and value are seperated with a colon and contained within curly brackets. Multiple properties are seperated by a semi colon. Multiple values within a property are sperated by commas, and if an individual value contains more than one word you surround it with quotation marks. As shown below.
body { background: #eeeeee; font-family: "Trebuchet MS", Verdana, Arial, serif; }As you can see in the above code I have seperated the color from the font-family with a semi-colon, seperated the various fonts with commas and contained the "Trebuchet MS" within quotations marks. The final result sets the body color to light grey, and sets the font to ones that most users will have installed on there computer. I have changed the way I layout my code, but you can arrange it in one line if you choose. I find that it is more readable if I spread each property to a seperate line, with a 2 space indention.
When you nest one element inside another, the nested element will inherit the properties assigned to the containing element. Unless you modify the inner elements values independently. For example, a font declared in the body will be inherited by all text in the file no matter the containing element, unless you declare another font for a specific nested element.
body {font-family: Verdana, serif;}Now all text within the (X)HTML file will be set to Verdana. If you wanted to style certain text with another font, like an h1 or a paragraph then you could do the following
h1 {font-family: Georgia, sans-serif;} p {font-family: Tahoma, serif;Now all <h1> tags within the file will be set to Georgia and all <p> tags are set to Tahoma, leaving text within other elements unchanged from the body declaration of Verdana.
There are instances where nested elements do not inherit the containing elements properties.
For example, if the body margin is set to 20 pixels, the other elements within the file will not inherit the body margin by default
You can combine elements within one selector in the following fashion.
h1, h2, h3, h4, h5, h6 { color: #009900; font-family: Georgia, sans-serif; }As you can see in the above code, I have grouped all the header elements into one selector. Each one is seperated by a comma. The final result of the above code sets all headers to green and to the specified font. If the user does not have the first font I declared it will go to another sans-serif font the user has installed on there computer.
Comments can be used to explain why you added certain selectors within your css file. So as to help others who may see your file, or to help you remember what you we're thinking at a later date. You can add comments that will be ignored by browsers in the following manner.
/* This is a comment */ You will note that it begins with a / (forward slash) and than an * (asterisks) then the comment, then the closing tag which is just backward from the opening tag * (asterisks) then the / (forward slash).The class selector allows you to style items within the same (X)HTML element differently. Similiar to what I mentioned in the introduction about inline styles. Except with classes the style can be overwritten by changing out stylesheets. You can use the same class selector again and again within an (X)HTML file. To put it more simply, this sentence you are reading is defined in my CSS file with the following.
P { font-size: small; color: #333333 }
Pretty simple, but lets say that I wanted to change the word "sentence" to green bold text, while leaving the rest of the sentence untouched. I would do the following to my (X)HTML file.
To put it more simply, this sentence you are reading is styled in my CSS file by the following.
Then in my CSS file I would add this style selector:
.greenboldtext{ font-size: small; color: #008080; font-weight: bold; }The final result would look like the following: To put it more simply, this sentence you are reading is styled in my CSS file by the following. Please note that a class selector begins with a (.) period. The reason I named it "greenboldtext" is for example purposes, you can name it whatever you want. Though I do encourage you to use selector names that are descriptive. You can reuse the "greenboldtext" class as many times as you want
IDs are similar to classes, except once a specific id has been declared it cannot be used again within the same (X)HTML file. I generally use IDs to style the layout elements of a page that will only be needed once, whereas I use classes to style text and such that may be declared multiple times. The main container for this page is defined by the following.
I have chosen the id selector for the "container" division over a class, because I only need to use it one time within this file. Then in my CSS file I have the following:
#container{ width: 80%; margin: auto; padding: 20px; border: 1px solid #666; background: #ffffff; }You will notice that the id selector begins with a (#) number sign instead of a (.) period, as the class selector does.
Ok so you have finished the first 4 chapters in my series. You have learned the very basics of CSS, how the syntax works and a bit about classes and IDs. Now we are gonna take a quick break from CSS and focus on the (X)HTML side of using it.
Divisions are a block level (X)HTML element used to define sections of an (X)HTML file. A division can contain all the parts that make up your website. Including additional divisions, spans, images, text and so on.
You define a division within an (X)HTML file by placing the following between the <body></body> tags:
Though most likely you will want to add some style to it. You can do that in the following fashion:
The CSS file contains this:
#container{ width: 70%; margin: auto; padding: 20px; border: 1px solid #666; background: #ffffff; }Now everything within that division will be styled by the "container" style rule, I defined within my CSS file. A division creates a linebreak by default. You can use both classes and IDs with a division tag to style sections of your website.
Spans are very similar to divisions except they are an inline element versus a block level element. No linebreak is created when a span is declared. You can use the span tag to style certain areas of text, as shown in the following:
Then in my CSS file:
.italic{ font-style: italic; }The final result is: This text is italic. The purpose of the last 2 chapters was to provide you with a basis for using CSS in an (X)HTML file. For a more detailed explaination of XHTML please visit W3Schools
As you may have guessed, the margin property declares the margin between an (X)HTML element and the elements around it. The margin property can be set for the top, left, right and bottom of an element. (see example below)
margin-top: length percentage or auto; margin-left: length percentage or auto; margin-right: length percentage or auto; margin-bottom: length percentage or auto;
As you can also see in the above example you have 3 choices of values for the margin property
You can also declare all the margins of an element in a single property as follows:
margin: 10px 10px 10px 10px;
If you declare all 4 values as I have above, the order is as follows:
If only one value is declared, it sets the margin on all sides. (see below
margin: 10px;
If you only declare two or three values, the undeclared values are taken from the opposing side. (see below)
margin: 10px 10px; /* 2 values */ margin: 10px 10px 10px; /* 3 values */
You can set the margin property to negative values. If you do not declare the margin value of an element, the margin is 0 (zero).
margin: -10px;
Elements like paragraphs have default margins in some browsers, to combat this set the margin to 0 (zero).
p {margin: 0;}
Note: You do not have to add px (pixels) or whatever units you use, if the value is 0 (zero). You can see in the example below, the elements for this site are set to be 20px (pixels) from the body
body{ margin: 20px; background: #eeeeee; font-size: small; font-family: Tahoma, Arial, "Trebuchet MS", Helvetica, sansserif; text-align: left; }
Padding is the distance between the border of an (X)HTML element and the content within it. Most of the rules for margins also apply to padding, except there is no "auto" value, and negative values cannot be declared for padding.
padding-top: length percentage; padding-left: length percentage; padding-right: length percentage; padding-bottom: length percentage;
As you can also see in the above example you have 2 choices of values for the padding property
You can also declare all the padding of an element in a single property as follows:
padding: 10px 10px 10px 10px;
If you declare all 4 values as I have above, the order is as follows:
If only one value is declared, it sets the padding on all sides. (see below)
padding: 10px;
If you only declare two or three values, the undeclared values are taken from the opposing side. (see below)
padding: 10px 10px; /* 2 values */ padding: 10px 10px 10px; /* 3 values */
If you do not declare the padding value of an element, the padding is 0 (zero). Note: You do not have to add px (pixels) or whatever units you use, if the value is 0 (zero). You can see in the example below, the main container for this site has 30px (pixels) of padding between the border and the text.
#container{ width: 70%; margin: auto; padding: 30px; border: 1px solid #666; background: #ffffff; }
You can set the color of text with the following:
color:value;
Possible values are
You can adjust the space between letters in the following manner. Setting the value to 0, prevents the text from justifying. You can use negative values
letter-spacing: value;
Possible values are
Example:
T h e s e l e t t e r s a r e s p a c e d a t 5 p x .
You can align text with the following:
text-align: value;
Possible values are
Examples:
You can decorate text with the following:
text-decoration: value;
Possible values are:
Examples:
This text is underlined.
This text is overlined.
This text has a line through it.
You can indent the first line of text in an (X)HTML element with the following:
text-indent: value;
Possible values are
Examples: This text is indented 10px pixels.
You can control the size of letters in an (X)HTML element with the following:
text-transform: value;
Possible values are
Example:
This First Letter In Each Word Is Capitalized, Though It Is Not In My File
THIS TEXT IS ALL UPPERCASE, THOUGH IT IS ALL LOWERCASE IN MY FILE
this text is all lowercase. though it is all uppercase in my file.
You can control the whitespace in an (X)HTML element with the following:
white-space: value;
Possible values are
You can adjust the space between words in the following manner. You can use negative values.
word-spacing: value;
Possible values are
Example:
These words are spaced at 5px.
The font property can set the style, weight, variant, size, line height and Font
font: italic bold normal small/1.4em Verdana, sans-serif;
The above would set the text of an element to an italic style a bold weight a normal variant a relative size a line height of 1.4em and the font to Verdana or another sans-serif typeface.
You can set what font will be displayed in an element with the fontfamily property. There are 2 choices for values:
If you set a family name it is best to also add the generic family at the end. As this is a priortized list. So if the user does not have the specified font name it will use the same generic family. (see below)
font-family: Verdana, sans-serif;
You can set the size of the text used in an element by using the fontsize property.
font-size: value;
There are alot of choices for values:
There is quite a bit to learn about font sizes with CSS so, I am not even going to try to explain it. Actually there are already some great resources on how to size your text.
You can set the style of text in a element with the font-style property
font-style: value;
Possible values are
You can set the variant of text within an element with the font-variant property
font-variant: value;
Possible values are
You can control the weight of text in an element with the font-weight property:
font-weight: value;
Possible values are
Below are the various ways you can use CSS to style links.
a:link {color: #009900;} a:visited {color: #999999;} a:hover {color: #333333;} a:focus {color: #333333;} a:active {color: #009900;}
Now lets take a look at what each one of the above link styles actually does.
a:link {color: #009900;}
The first on the list sets the color of a link when no event is occuring
a:visited {color: #999999;}
The second sets the color a link changes to, when the user has already visited that url
a:hover {color: #333333;}
The third sets the color a link changes to as the user places their mouse pointer over the link
a:focus {color: #333333;}
The fourth is primarilly for the same purpose as the last one, but this one is for users that are not using a mouse and are tabbing through the links via there keyboards tab key, it sets the color a link changes to as the user tabs through the links
a:active {color: #009900;}
The fifth on the list sets the color a link changes to as it is pressed. Lets look at an example: Google If your last visit to Google is not stored in your cache than the above link to google is blue, if you have already been to google then the link should be grey. if you mouseover or tab through the links, the link will change to dark grey, and last but not least if you click and hold the link without releasing it you will see it return back to the original blue color. You must declare the a:link and a:visited before you declare a:hover. Furthermore, you must declare a:hover before you can declare a:active. Using the above code will style all links on your web page, unless you declare a seperate set of link styles for a certain area of your webpageIf your last visit to Google is not stored in your cache than the above link to google is blue, if you have already been to google then the link should be grey. if you mouseover or tab through the links, the link will change to dark grey, and last but not least if you click and hold the link without releasing it you will see it return back to the original blue color. You must declare the a:link and a:visited before you declare a:hover. Furthermore, you must declare a:hover before you can declare a:active. Using the above code will style all links on your web page, unless you declare a seperate set of link styles for a certain area of your webpage.
You can set links contained in different parts of your web page to be different colors by using the pseudo class. For example, lets say you want your links in the content area to have a different color then the links in the left or right column of your webpage.
You can do this in the following fashion:
#content a:link {color: #009900;} #content a:visited {color: #999999;} #content a:hover {color: #333333;} #content a:focus {color: #333333;} #content a:active {color: #009900;}
Now assuming that you have your main content in a division named "content" all links within that division will now be styled by this new style selector. Should your selector have a different name, just change the #content selector to match your division name. Then for the links in a column you could use the following:
#column a:link {color: #009900;} #column a:visited {color: #999999;} #column a:hover {color: #333333;} #column a:focus {color: #333333;} #column a:active {color: #009900;}
Once again, this assumes the name of the column division, just change the name to match yours. This same method can be accomplished by declaring a class instead of an id.
a.column:link {color: #009900;} a.column:visited {color: #999999;} a.column:hover {color: #333333;} a.column:focus {color: #333333;} a.column:active {color: #009900;}
Though in this case you will need to add a class to each link
some link text
But, there is still yet an easier way
.column a:link {color: #009900;} .column a:visited {color: #999999;} .column a:hover {color: #333333;} .column a:focus {color: #333333;} .column a:active {color: #009900;}
Then in the (X)HTML file
There are other properties that can be added to links other than color, I was just trying to keep it simple. Almost any property that can be used to style text and fonts can be used to style links also
You can style the background of an element in one declaration with the background property.
background: #ffffff url(path_to_image) top left no-repeat fixed;
Values:
If you are using an image as a background. You can set whether the background scrolls with the page or is fixed when the user scrolls down the page with the background-attachment property
background-attachment: value;
Values:
You can specifically declare a color for the background of an element using the background-color property.
background-color: value;
Values:
You can set an image for the background of an element using the background-image property
background-image: url(path_to_image);
Values:
You can position an image used for the background of an element using the background-position property.
background-position: value;
Values:
You can set if an image set as a background of an element is to repeat (across=x and/or down=y) the screen using the background-repeat property.
background-repeat: value;
Values:
You can set the color, style and width of the borders around an element in one declaration by using the border property.
border: 1px solid #333333;
Values:
Or you can set each property individually
You can set the color of a border independently with the border-color property.
border-color: value;
Values:
Or you can set each property individually
You can set the style of a border independently with the border-style property.
border-style: value;
Values:
You can set the color, style and width of the bottom border around an element in one declaration with the border-bottom property.
border-bottom: 1px solid #333333;
Values:
Or you can set each value individually
You can set the color of the bottom border around an element with the border-bottom-color property
border-bottom-color: value;
You can set the style of the bottom border around an element with the border-bottom-style property.
border-bottom-style: value;
You can set the width of the top border around an element with the border-top-width property.
border-top-width: value;
You can control the appearance of ordered and unordered lists in one declaration with the list-style property
list-style: value value;
Values:
Or you can control them individually
You can use an image for the bullet of unordered lists with the list-style property
list-style-image: url(path_to_image.gif, jpg or png);
If you use an image, it is a good idea to declare the list-style-type also in case the user has images turned off.
You can control the position of ordered and unordered lists with the liststyle-position property
list-style-position: value;
Values
You can control the type of bullet ordered and unordered lists use with the list-style-type property
list-style-type: value;
Values
You can control the height of an element with the height property
height: value;
Values
You can control the height between lines with the line-height property
line-height: value;
Values
You can control the minimum height of an element with the min-height property
min-height: value;
Values
You can control the width of an element with the width property
width: value;
Values
You can control the maximum width of an element with the max-width property
max-width: value;
Values
You can control the minimum width of an element with the min-width property
min-width: value;
Values
You can control if an element allows floated elements to its sides with the clear property
clear: value;
Values
Now, what does all that mean?
This is the default setting, floated elements can appear on either side of the element set to clear: none;
Setting the value to both, causes no floated elements to appear on either side of the element set to clear: both;
Setting the value to left, causes no floated elements to appear to the left side of the element set to clear: left;
Setting the value to right, causes no floated elements to appear to the right side of the element set to clear: right;
You can control how much of an element is visible with the clip property
clip: value;
Values
You can control the style of cursor to be used in an element with the cursor property
cursor: value;
Values
If you choose to use a custom cursor, it is always a good idea to declare a generic one after the custom value
cursor: url("image.cur"), default;
You can control how an element is displayed with the display property
desplay: value;
Values
Now, what does all that mean?
Creates a line break before and after the element
No line break is create
Creates a line break before and after the element and adds a list item marker
Makes an element not display on the page
The float property changes how text and or images within an element are displayed
float: value;
Values
Now, what does all that mean?
The image/text is displayed to the left of the parent element
The image/text is displayed to the right of the parent element
There is no change in the way the image/text is displayed
You can control what an elements contents will do if it overflows it boundaries with the overflow property
overflow: value;
Values
As you can see, with this property you can mimic an iframe. This box is set to an overflow value of "auto". Meaning that if the contents of the element break the boundaries it should add a scrollbar.
You can control the layer order of positioned elements with the z-index property
z-Index : value;
Values
The higher the number the higher the level. Negative numbers are allowed
The position property (as you may have guessed) changes how elements are positioned on your webpage.
position: value;
Values
Now, what does all that mean?
Static positioning is by default the way an element will appear in the normal flow of your (X)HTML file. It is not necessary to declare a position of static. Doing so, is no different than not declaring it at all
position:static;
<4>relative4>
Positioning an element relatively places the element in the normal flow of your (X)HTML file and then offsets it by some amount using the properties left, right, top and bottom. This may cause the element to overlap other elements that are on the page, which of course may be the effect that is required.
position:relative;
Positioning an element absolutely, removes the element from the normal flow of your (X)HTML file, and positions it to the top left of it's nearest parent element that has a position declared other than static. If no parent element with a position other than static exists then it will be positioned from the top left of the browser window.
position:absolute;
Positioning an element with the fixed value, is the same as absolute except the parent element is always the browser window. It makes no difference if the fixed element is nested inside other positioned elements. Furthermore, an element that is positioned with a fixed value, will not scroll with the document. It will remain in it's position regardless of the scroll position of the page. At this time IE6 (Internet Explorer 6) does not support the fixed value for the positioning of an element. Thus it will not position fixed elements correctly and will still scroll with the page. To see this effect in action you will need to use a standards compliant browser, such as Firefox 1.0
position:fixed;
The syntax for pseudo elements is a bit different than that of regular CSS, but it's real close. If you have already read chapter 11 then you are slightly ahead of the game.
selector:pseudo-element {property: value}
As you can see the only difference is that you place the pseudo element after the selector, and divide the 2 with a (:) colon. Or you can assign a class to a pseudo element as follows
selector.p:pseudo-element {property: value}
Using the above code would style all paragraphs within the declared selector with the pseudo element.
The first-line pseudo element styles the first line of text in a block level element.
p{font-size: small;} p:first-line {font-size: medium; color: #ff0000;}
As you can see in the above example paragraphs are set to be a small font size, but the p:first-line is set to be a medium size and a red color. The result is that the first line of all paragraphs will be red in color and a bit larger than the rest of the paragraph. Though lets say you only want to style a certain paragraph of text with the first-line element. Thats where declaring a class to the pseudo element comes into play.
p.special:first-line {font-size: medium; color: #ff0000;}
I have declared a class of special within my css file.
First-Line ExampleThis is a special sentence I wrote to demonstrate the use and look of the first-line pseudo element. As you can see the first line of this paragraph is styled differently than the rest of the text within it. All of this was done by simply adding class="special" to the opening
tag for this paragraph
the content
Where the first-line ends depends on the width of the browser window or containing element, you can resize this page and see that it adjusts as you change the size of the browser window. The following properties can be assigned to the first-line pseudo element:
The first-letter pseudo element styles the first letter of text in a block level element.
p{font-size: small;} p:first-letter {font-size: medium; color: #ff0000;}
As you can see in the above example paragraphs are set to be a small font size, but the p:first-letter is set to be a medium size and a red color. The result is that the first letter of all paragraphs will be red in color and a bit larger than the rest of the paragraph. Though lets say you only want to style a certain paragraph of text with the first-letter element. Thats where declaring a class to the pseudo element comes into play.
p.special_letter:first-letter {font-size: x-large; font-weight: bold; color: #ff0000;}
I have declared a class of special_letter within my css file.
This is a special sentence I wrote to demonstrate the use and look of the first-letter pseudo element. As you can see the first letter of this paragraph is styled differently than the rest of the characters within it. All of this was done by simply adding class="special_letter" to the opening <p> tag for this paragraph.
the content
The following properties can be assigned to the first-letter pseudo element:
JavaScript
There’s a few ways to try out JavaScript, and when learning it’s best to try them out to see what works for you. But first, how does JavaScript relate to HTML and CSS?
Mostly, JavaScript runs in your web browser alongside HTML and CSS, and can be added to any web page using a script tag. The script element can either contain JavaScript directly (internal) or link to an external resource via a src attribute (external). A browser then runs JavaScript line-by-line, starting at the top of the file or script element and finishing at the bottom (unless you tell it to go elsewhere).
You can just put the JavaScript inside a script element:
An external JavaScript resource is a text file with a .js extension, just like an external CSS resource with a .css extension. To add a JavaScript file to your page, you just need to use a script tag with a src attribute pointing to the file. So, if your file was called script.js and sat in the same directory as your HTML file, your script element would look like this:
The last way is great for getting instant feedback, and it’s recommend if you just want to try a line out quickly. In a modern browser you’ll find some developer tools - often you can right click on a page, then click “inspect element” to bring them up. Find the console and you’ll be able to type JavaScript, hit enter and have it run immediately. Search the net if you can’t find your dev tools or console - they’re changing in browsers all the time.
o get started, the best way is the internal method. You can modify the contents of the script element and refresh the page just like you’re used to - quick and easy. Now it’s time to learn some JavaScript. Good luck!
Storing data so we can use it later is one of the most important things when writing code. Fortunately, JavaScript can do this! If it couldn’t, it’d be pretty darn useless
So let’s ask the user (that’s you) for their surname (check your driving license, or ask a friend).
A little box will pop-up, asking (very courteously if I may say) for your surname. Type your surname in and hit ‘OK’. The surname you entered is now saved, and it can be referred to as surname. You can get what you entered back out again by typing surname into the console. You should see your surname appearing back to you underneath! Exciting! You’ve created a Variable.
Think, if you will, of a variable as a shelf with a name so it’s easy to get back to. You’ve named a shelf surname. You can name a variable anything you like, but it’s best to name it in a way that tells what you’ve stored there. For example, surname is better than mything or s. When you type a variable name into the console you are asking the browser, which looks after the shelves, to go find the shelf and give what’s on it to you. This is also known as the variable’s value. The value can be almost anything - in surname, you’ve stored some letters, known as a string. You can also store numbers and a myriad other kinds of data. So, a variable has a name and a value. They are the way we store data, and you’ll be using them a lot. There are two parts to creating a variable; declaration and initialization. Once it’s created, you can assign (or set) its value.
Declaration is declaring a variable to exist. To return to the shelf metaphor, it’s like picking an empty shelf in a massive warehouse and putting a name on it. As above, to declare a variable, use the var keyword followed by the variable name, like this:
var surname;
var age;
Notice: those semicolons (“;”)? Almost every line in JavaScript ends in a semicolon - you’ll be using them a lot.
Initialization is giving a variable its value for the first time. The value can change later, but it is only initialized once. You initialize a variable using the equals sign (=). You can read it as “the value of the variable on the left should be the data on the right”:
var name = "Tom";
“Tom” is a string - a collection of letters. A string is surrounded by single or double quote marks.
var age = 20;
20 is just a number - and numbers don’t go in quotes.
As mentioned, you can set a variable’s value as many times as you like. It’s called assignment and it looks very similar to initialization. You again use the equals sign, but there’s no need for the var keyword because we’ve already declared the variable. It’s like this, yo:
name = "Andy";
age = 43;
Only do this if you’ve declared the variable using the var keyword
Variables can be used to store strings and numbers (amongst other things), but here the focus is on numbers.
In your console, let’s create two variables. One will be the number of apples we have, the second will be the number of pears.
var apples = 5, pears = 10;
That creates two variables… but there’s only one var keyword? Yup, it’s a shorthand for declaring and initializing multiple variables at the same time. By using the var keyword once and separating the new variables with commas you can save yourself some work. Now, use these two variables to figure out how many pieces of fruit there are in total.
var piecesOfFruit = apples + pears;
So that’s new. You’re asking the browser to work out the sum on the right before assigning the result to piecesOfFruit - and you’re not adding the variable names, you’re adding the values of the variables. The browser knows that, when it sees a variable like this, you want to do something with the value. So it goes and gets each variable’s value before doing the sum. . The sum is called piecesOfFruit, not pieces of fruit. This is because variable names cannot contain spaces! There’s a set of rules somewhere about what you can and can’t use, but for now just use letters with no spaces.
Noice:You may have also noticed that the uppercase “O” on “Of” and “F” on “Fruit”. This is a convention, called camel casing (cos of the humps), that makes the variable name easier to read. You can call a variable anything you want, but pIeCEsOFfRuiT is pretty hard to read, no? Here’s a tip for you: code is read many, many more times that it is written. So it’s really, really important to make sure your code is easy to read. Really important.
Let’s say you want to split your fruit between 3 people. How much fruit does each person get?
var piecesForEachPerson = piecesOfFruit / 3;
Thank goodness we have this JavaScript thing, otherwise you’d need a calculator for that one… You’re using a forward slash (“ / ”) to indicate division: divide the thing on the left by the thing on the right.
For doing sums you can use various symbols: add (“ + ”), subtract (“ - ”), divide (“ / ”) and multiply (“ * ”). Mathematical symbols are called operators; that is, they operate on some data. We’ll meet even more operators later on, but you should know that, like on a calculator, the symbols are worked out in a particular order, called operator precedence. Things in parentheses - that’s these: “ ( ” and “ ) ” - are done first, then multiplication and division, then addition and subtraction. Here’s an example, stepping through how the browser runs it:
(10 + 2) / 2 + 4 * 2
The part in brackets is worked out first. So this becomes…
12 / 2 + 4 * 2
…which works out to…
6 + 4 * 2
Then things are done in operator precedence order. If multiple sums are of the same precedence then they are evaluated left to right. The multiplication is higher precedence so is done first, which works out to
6 + 8
This is used to work out the final value:
14
A really important part of programming is being able to compare values in order to make decisions in code. When a comparison is made the outcome is either true or false; a special kind a of data called a boolean. This is logic.
Like when doing math, there’s a set of operators that work on booleans. They are used to compare two values, on the left and right of the operator, to produce a boolean value.
The following comparisons are made in the console. The result we get from each line (shown underneath) will be true or false; these are booleans.
To find out when two values are equal, use the triple equals operator (“===”).
15.234 === 15.234
true
We can also determine if two values are not equal using the triple not equal operator (“!==”).
'10' === 10
false
Comparing two numbers is useful, for example, to determine which of two is larger or smaller. This first example is a comparison of 10 and 5 to see if 10 is larger, using the greater than operator (“>”).
10 > 5
true
Next we use the less than operator (“<”) to determine if the left value is smaller.
20.4 < 20.2
false
That example gives back (or returns) false, because 20.4 is not a smaller number than 20.2.
Combining a comparison of equality and size can be done with the greater than or equal to and less than or equal to operators (“>=” and “<=” respectively).
10 >= 10
true
10 <= 5
false
Logic is used to make decisions in code; choosing to run one piece of code or another depending on the comparisons made. This requires use of something called a conditional. There are a few different conditionals that you might want to use, but we’ll just focus the one used most commonly: if.
It’s very simple: if some logic (the condition) is true, run a block of code. You can also supply more code to be run if the condition is not true, and supply additional conditions and blocks of code to optionally be run. These forms are called if-else, as you’ll see below. The most simple if statement looks something like this:
if (10 > 5) {
// Run the code in here
}
The code between the braces - “{” and “}” - is called a block, and this one is linked to the if statement. It’s only run if the conditional (between the parentheses) is true. 10 is indeed greater than 5, so the code in the block would run.
Notice:Oh, and the line starting “//”? The double slashes indicate comment, which means that everything after the slashes until the end of the line is ignored by the browser.
The if-else form of an if statement is used to run an alternative piece of code if the conditional is not true. The code in the if block below will be ignored, for example - only the code in the else block will be run.
if (43 < 2) {
// Run the code in here
} else {
// Run a different bit of code
}
Loops are a way of repeating the same block of code over and over. They’re incredibly useful, and are used, for example, to carry out an action on every item in an array (we will come to arrays later) or in searching.
Two of the most common loops are while loops and for loops. They combine a conditional and a block, running the block over and over until the logic of the conditional is no longer true, or until you force them to stop.
A while loop repeats a block of code while a condition is true. Like an if statement, the condition is found in parentheses.
var i = 1;
while (i < 10) {
alert(i);
i = i + 1;
}
// i is now 10
After looping has finished the code carries on running from just after the closing brace (“}”) of the loop’s block.
A for loop is similar to an if statement, but it combines three semicolon-separated pieces information between the parentheses: initialization, condition and a final expression. The initialization part is for creating a variable to let you track how far through the loop you are - like i in the while example; the condition is where the looping logic goes - the same as the condition in the while example; and the final expression is run at the end of every loop.
for (var i = 1; i < 10; i++) {
alert(i);
}
Notice:This gives us alert boxes containing the numbers 1 to 10 in order.
By the way, i++ is equivalent to i = i + 1.
Functions are reusable blocks of code that carry out a specific task. To execute the code in a function you call it. A function can be passed arguments to use, and a function may return a value to whatever called it.
doSomething();
findAnInterestingThing();
To create a function, use the function keyword. You then list the arguments in parentheses, and then supply a block that contains the function’s code. Here’s a function that adds two numbers:
var add = function (a, b) {
return a + b;
};
a and b are the function’s parameters, and the value it returns is signified by the return keyword. The return keyword also stops execution of the code in the function; nothing after it will be run.
var result = add(1, 2); // result is now 3
This calls add with the arguments 1 and 2, which, inside add, will be saved in the variables a and b.
JavaScript objects are like a real life objects; they have properties and abilities. A JavaScript object is, in that sense, a collection of named properties and methods - a function. An object can be stored in a variable, and the properties and methods accessed using the dot syntax. A human, for example, has a name and an age, and could talk, move or learn JavaScript. Name and age are properties of the human, and are essentially pieces of data. Talking, moving and learning are more like functions - there’s some complex behavior involved. When a JavaScript object has such an ability, it is called a method.
Variables can hold objects, and creating an object is done using a special syntax signified by braces:
var jedi = {
name: "Yoda",
age: 899,
talk: function () { alert("another... Sky... walk..."); }
};
The Jedi’s name and age are properties - they are essentially variables within the object and can store anything a variable can. talk is a property that holds a function - a method. You can get data back out of an object using the dot syntax:
jedi.name;
Yoda
jedi.name;
Yoda
jedi.age;
899
jedi.talk();
//produces an alert box
You can also reassign properties of an object:
jedi.name = "Mace Windu";
And add new ones on the fly:
jedi.lightsaber = "purple";
Properties can be any kind of data including objects and arrays. Adding an object as a property of another object creates a nested object:
var person = {
age: 122
};
person.name = {
first: "Jeanne",
last: "Calment"
};
Creating an empty object and adding properties and methods to it is possible too:
var dog = {};
dog.bark = function () { alert("Woof!"); };
Arrays are lists of any kind of data, including other arrays. Each item in the array has an index — a number — which can be used to retrieve an element from the array.
The indices start at 0; that is, the first element in the array has the index 0, and subsequent elements have incrementally increasing indices, so the last element in the array has an index one less than the length of the array.
In JavaScript, you create an array using the array-literal syntax:
var emptyArray = [];
var shoppingList = ['Milk', 'Bread', 'Beans'];
You retrieve a specific element from an array using square bracket syntax:
shoppingList[0];();
Milk
It’s also possible to set the value at a particular index, again using the square bracket syntax:
shoppingList[1] = 'Cookies';
// shoppingList is now ['Milk', 'Cookies', 'Beans']
You can find the number of elements in the array using its length property:
shoppingList.length;
3
You can use push and pop methods to add and remove elements from the end of the array:
shoppingList.push('A new car');
// shoppingList is now ['Milk', 'Bread', 'Beans', 'A new car']
shoppingList.pop();
// shoppingList is back to ['Milk', 'Bread', 'Beans']
Here’s an example that creates, pushes, pops and iterates over an array, passing each name to a function called helloFrom. helloFrom returns a string with a greeting: “Hello from ” and then the person’s name. After the pushing and popping, the final list of people is: “Tom”, “Yoda”, “Ron” and “Bob”.
Ajax
JAX is an acronym for Asynchronous JavaScript and XML. It is a group of inter-related technologies like javascript, dom, xml, html, css etc. AJAX allows you to send and receive data asynchronously without reloading the web page. So it is fast. AJAX allows you to send only important information to the server not the entire page. So only valuable data from the client side is routed to the server side. It makes your application interactive and faster.
There are too many web applications running on the web that are using ajax technology like gmail, facebook,twitter, google map, youtube etc.
This chapter gives you a clear picture of the exact steps of AJAX operation.
In this step, we will write a function that will be triggered by the client event and a callback function processRequest() will be registered.
Source code is available in the above piece of code. Code written in bold typeface is responsible to make a request to the webserver. This is all being done using the XMLHttpRequest object ajaxRequest.
Assume you enter Zara in the userid box, then in the above request, the URL is set to "validate?id=Zara".
You can implement your server-side script in any language, however its logic should be as follows.
If we assume that you are going to write a servlet, then here is the piece of code.
The XMLHttpRequest object was configured to call the processRequest() function when there is a state change to the readyState of the XMLHttpRequest object. Now this function will receive the result from the server and will do the required processing. As in the following example, it sets a variable message on true or false based on the returned value from the Webserver.
This is the final step and in this step, your HTML page will be updated. It happens in the following way:
If you have understood the above-mentioned seven steps, then you are almost done with AJAX. In the next chapter, we will see XMLHttpRequest object in detail.
The XMLHttpRequest object is the key to AJAX. It has been available ever since Internet Explorer 5.5 was released in July 2000, but was not fully discovered until AJAX and Web 2.0 in 2005 became popular. XMLHttpRequest (XHR) is an API that can be used by JavaScript, JScript, VBScript, and other web browser scripting languages to transfer and manipulate XML data to and from a webserver using HTTP, establishing an independent connection channel between a webpage's Client-Side and Server-Side. The data returned from XMLHttpRequest calls will often be provided by back-end databases. Besides XML, XMLHttpRequest can be used to fetch data in other formats, e.g. JSON or even plain text. You already have seen a couple of examples on how to create an XMLHttpRequest object. Listed below are some of the methods and properties that you have to get familiar with.
Cancels the current request.
Returns the complete set of HTTP headers as a string.
Returns the value of the specified HTTP header.
Specifies the method, URL, and other optional attributes of a request. The method parameter can have a value of "GET", "POST", or "HEAD". Other HTTP methods such as "PUT" and "DELETE" (primarily used in REST applications) may be possible. The "async" parameter specifies whether the request should be handled asynchronously or not. "true" means that the script processing carries on after the send() method without waiting for a response, and "false" means that the script waits for a response before continuing script processing
Sends the request.
Adds a label/value pair to the HTTP header to be sent.
An event handler for an event that fires at every state change.
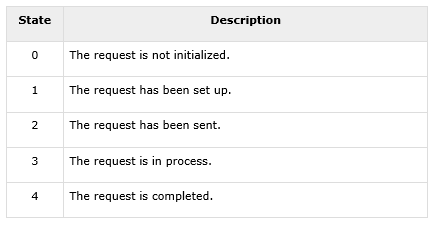
The readyState property defines the current state of the XMLHttpRequest object. The following table provides a list of the possible values for the readyState property:
readyState = 0 – After you have created the XMLHttpRequest object, but before you have called the open() method.
readyState = 1 After you have called the open() method, but before you have called send().
readyState = 2 After you have called send().
readyState = 3 After the browser has established a communication with the server, but before the server has completed the response.
readyState = 4 After the request has been completed, and the response data has been completely received from the server.
To clearly illustrate how easy it is to access information from a database using AJAX, we are going to build MySQL queries on the fly and display the results on "ajax.html". But before we proceed, let us do the ground work. Create a table using the following command.
NOTE: We are assuming you have sufficient privilege to perform the following MySQL operations.
Now dump the following data into this table using the following SQL statements:
Now let us have our client side HTML file, which is ajax.html, and it will have the following code:
NOTE: The way of passing variables in the Query is according to HTTP standard and have formA.
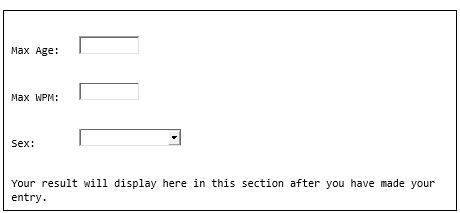
The above code will give you a screen as given below:
Your client-side script is ready. Now, we have to write our server-side script, which will fetch age, wpm, and sex from the database and will send it back to the client. Put the following code into the file "ajax-example.php".
Now try by entering a valid value (e.g., 120) in Max Age or any other box and then click Query MySQL button.
If you have successfully completed this lesson, then you know how to use MySQL, PHP, HTML, and Javascript in tandem to write AJAX applications.
AJAX is growing very fast and that is the reason that it contains many issues with it. We hope with the passes of time, they will be resolved and AJAX will become ideal for web applications. We are listing down a few issues that AJAX currently suffers from.
Server-side developers will need to understand that presentation logic will be required in the HTML client pages as well as in the server-side logic.
Page developers must have JavaScript technology skills.
JavaScript is hard to test - automatic testing is hard.
Weak modularity in JavaScript.
Lack of design patterns or best practice guidelines yet.
Most of them are in beta phase.
Future version of IE will address this.
Iframe will help.
Must be enabled for applications to function.
Still some browser incompatibilities exist.
Poorly designed JavaScript code can invite security problems.
jQuery
jQuery is a JavaScript based library that makes using the JavaScript much easier for your web based applications. The JQuery is fast, much easy to use, small in size – around 32Kb, and contains a lot of features.
You have to write lots of JavaScript code to accomplish tasks that jQuery enables you to write with much less code. Its aim is to write less do more.
The jQuery is cross platform compatible, i.e. supported by many popular browsers like Chrome, Firefox, IE, Safari and others.
jQuery makes things quite simple like HTML document transversal and manipulation, handling events (like clicking on links, mouse up, mouse down etc.), animations for your applications (like slider, loader) and Asynchronous JavaScript and XML (AJAX) operations with an easy to use API.
You can do many things like cool jQuery sliders, slideshows, menus, fade-in/fade-out effects, beautiful dropdowns… just a few examples that can be done with jQuery.
There are many other JavaScript frameworks out there like Ext JS, Dojo etc. however, the jQuery is the most widely used and popular JavaScript framework.
The tutorial will take you through installing jQuery, Syntax of jQuery, environment setup and working examples of jQuery in following chapters.
Installing or setting up jQuery to enable you working in your web applications is quite simple. This does not require any compilation.
You just have to place or refer library file of the jQuery in your HTML files to work with it. The following section describes how you can do it.
You can download the jQuery library from It is recommended to download uncompressed file for the development machine and compressed file for production (where your site is hosted). Click the link to learn more about the difference between jQuery.js and jQuery.min.js.
After downloading and placing uncompressed file to your development machine, place it to the same directory where your code files are. After that, you can use following code to include jQuery library in your HTML file:
CDNs (Content Delivery Networks) offer to include jQuery in your web documents. You simply have to give URL of one of the available jQuery library.
jQuery CDN
Google CDN http://ajax.50-game.com/ajax/libs/jquery /1.10.2/jquery.min.js
Microsoft CDN
One of the benefits of using the CDN is, if another website is using that CDN and loaded by the browser, Your website will use a pre-loaded library in the cache.
This is how you will include jQuery library in HTML file by referring CDN:
In this tutorial for beginners, we have used both types of jQuery libraries in examples – from host machine where the website is hosted as well as referring from CDN (Google and jQuery’s CDN).
The most important purpose of jQuery is: select elements and do some action on those selected elements. The jQuery selectors allow you to search or select HTML elements and then perform intended action on those.
For example, we see Show/Hide feature in many sites for some part of the page. This can be done by using selectors. We can code all HTML of the show or hide part in a particular class e.g. “.showmenu” class. When Show (button or link) is clicked the menu will be shown and vice versa.
Selectors in jQuery start with: $()
This chapter explains important selectors one by one with examples. Note that, for the examples below we have placed jQuery library at the jQuery folder where HTML file is also placed.
$(“#ID_of_Element”);
The ID will be represented by “#” followed by ID of the element that should be unique in the document. In HTML, your paragraphs, form buttons, Div etc. can be ID based. The selector jQuery will search for the given id in the document and perform given action.
In the following example, a Div with id=text will be shown while Show button is made hidden when the document is ready. As you click on “Hide text” button, the div will be hidden and “Show text” button will be shown.
$(“.classname”);
Selecting elements by class names requires calling by ‘.’ (period) followed by the class name of the element. The jQuery selector will search for the given class in the document and performs the specified action.
Following is an example of the selector in jQuery by the class name. Apparently, this is just like the above example, except we are using the class selector.
In the example below, a Div with class=text will be shown and Show button is made hidden when the document is loaded. As you click on the “Hide text” button, the div will be hidden and “Show text” button will be visible.
In real time development, your class name specifications may be specified in an external CSS file.
$(‘html_tag_name’);
Where HTML tag name can be p, div, img etc. e.g.
$(‘p’) – select all elements with name p in the page.
$(‘div’) = select all elements with name div in the page.
Same example as given above except that we used tag name div to hide and show text in jQuery selector rather the class name. If you have multiple div tags in the page it will show/hide all Divs.
In your web projects, the presentation layer or HTML may contain classes. For example in DIV, paragraphs, links and others may use classes to format HTML elements. e.g.
In order to perform actions on these elements on the basis of class attribute, jQuery provides the Class selector.
Following is the syntax of class selector:
$(“.class”);
Selecting the elements by class names require it calling by a ‘.’ (period) followed by the class name used in the element. The jQuery class selector will search for the given class in the document and perform the desired action.
For example:
$(“.myDivclass”).show;
$(“.myPclass”).hide;
The following is a basic example that explains class formatting and then using it in the class element selector. The internal CSS is used to create the classes that are placed in the <head> section. Normally, you may want to use the external CSS.
In the example, as Green Text is clicked it will show only the green text and hides the red and orange <p> (paragraphs) by using the jQuery class selector. When the red text is clicked, only red will display while orange and green will be hidden by using jQuery hide() method.
Save the following code in the jquerytest.html file or some other name of your choice and run it in your browser. Note that, the jQuery library is included from the Google CDN, so you don’t need to download and refer its physical path.
Testing text Testing text Testing text Testing text Testing text Testing text Testing text Testing text Testing text
For a well-designed website, showing images or text upon certain action by the visitor or transition in images for marketing pictures leaves a good impression. This is the fading effect that jQuery makes quite easier to do.
The jQuery fadeIn() method allows to fade-in elements of a website. For example, a
or some other element that may contain text, images or other content. The fadeIn jQuery method slowly changes the opacity of the given element from hidden to visible.
$(selector).fadeIn(speed,callback);
Where:
Selector = can be an element like div, p, etc.
Speed = Optional parameter that specifies the fadeIn speed with the possible values of
Callback = after the fadeIn () method is completed, an optional callback function to perform some action.
The fadeOut() method fades out the visible elements of a website, for example
etc. that may contain the text, images or other content.
The fadeOut method slowly changes the opacity of the given element from visible to hidden.
$(selector).fadeOut(speed,callback);
Where:
Selector = is an element, for example, a paragraph, a div etc.
Speed = This is where you can define the speed of fading out. The values can be:
Callback = after fadeOut() method is completed, an optional callback function.
Following example shows how to use the fadeOut method. In this example, as you click “FadeOut jQuery” button it will hide (fade out) three visible blocks with fast, slow and 3000 milliseconds speed.
Click the link below to see the output and code:
The jQuery show() method is used to show the hidden elements of HTML in the web document. Note that, the show method would not show elements which property are set to Hidden by visibility property, i.e. visibility: hidden in CSS.
The elements that are hidden by using the hide() method or with CSS property display: none; can be shown by using the show() method.
$(selector).show(speed,callback)
Where
Selector = This can be an HTML element like div, p, list etc.
Speed = This is an optional parameter with three possible values:
Callback = after the jQuery show() method is executed, an optional callback function can be used.
Following example shows how to use the show method. We have used a div element that contains a yellow line with text, which is hidden initially. As you click on the button the div element will be shown by using the show method.
The jQuery hide() method hides the specified HTML elements like DIV, paragraphs or other elements. The hide jQuery method can be used to make user’s experience better in order to provide them facility what to show and what to not in a website besides other uses.
Following is the syntax of hide method:
$(selector).hide(speed,callback)
Where
The Selector can be an element like div, p, etc. in hide method.
Speed = This is an optional parameter with the following possible values:
Callback = after hide() method is completed, an optional callback function to perform certain action.
In this example, we will use the hide method to hide a DIV with the name “text” after clicking “Hide yellow line” button.
Just copy paste the given code to a new HTML file and name it e.g. test_hide.html or click the link below to see online demo.
As mentioned in the above section, you can use a callback function with hide method. In the example below as you click the button, the yellow line in div element will be hidden by using the jQuery hide method and as it completes the callback function will trigger an alert.
The hide method is pretty useful for providing sections that you want to let your users hide like menus, social bars in div,
etc elements. However, once an element is hidden you have to use show method to allow users see the hidden element/content again. In order to let users show and hide we recommend using the jQuery toggle method.
A powerful feature of the jQuery is the animation method to use in web pages in an easy to use way. We know how CSS powers HTML in styling or presenting web documents for good user experience. How about animating CSS styles/properties using the jQuery animate method?
The animate method is used to create custom animations on the basis of CSS properties.
In this tutorial, we will go through how to use the animate in jQuery along with CSS properties that can be used for animations.
Following is the general syntax of animate method:
$(selector).animate({css_properties},duration, easing, complete);
Where
The Selector can be an element like div, p, etc.
css_properties = CSS properties to be given here to use in animation – see examples below.
Duration = Optional parameter that specifies the animation speed with the following possible values:
Easing = [optional] Specifying transition function value here with possible values of ‘swing’ and ‘linear’. The Linear moves animation at a constant speed from the start to end.
Complete = after the animate method is completed, an optional callback function can be used.
Below are a few examples of jQuery animations using the animate method with different CSS properties.
Following example shows how to use animate method for the height animation. A div element is used for animate height example.
Following example uses animate method for width animation of Div element. See demo online by clicking the link below:
The example below uses multiple CSS properties (height and width) to animate a DIV element of the document by the $.animate method.
In this example, multiple animate method calls will be used for animation. The jQuery, by default, creates an internal queue for animate calls. This is very useful if the first animation is required to be completed and then starting the second animation and so on.
In above example, we have seen height and width animation of DIV executed simultaneously. In the following example, first width animation will be completed followed by the height by using jQuery animate.
In the following example, we will first animate width and height and then increase the font size of text with jQuery animation method.
Alerts or dialogue boxes are widely used these days, in order to interact with visitors of websites. For example, filling an online form or Alerting before the exit to another page. jQuery provides ways to make fancy alert boxes to be used for the websites.
Example 1: Basic jQuery Alert Box
Following is a basic alert box example that has only one option: Show the message to the user with an OK option to close the alert box. See the example by clicking the link below:
This confirmation alert is used where you want to confirm a user before proceeding to perform something. For example, closing a window and asking a user “Are you sure you want to exit?”.
This can be used for scenarios where you need user input values, for example, Your Name or age or location before proceeding to the next step.
The click event occurs when an element of HTML document is clicked. For example, clicking a button, a paragraph, a Div, a link or an image etc.
Where click function is optional. The function runs as the click event occurs.
Examples of how this event can be applied to different elements.$(“p”).click(function)
$(“div”).click(function)
$(“button”).click(function)
You can use click method by element ID or class name as well.
Following are a few examples of click jQuery method with different HTML elements.
In the following example, as the first paragraph is clicked, the jQuery triggers click event handler that will show an alert. The jQuery click method is attached with the clickme paragraph id.
Copy and paste the code into HTML file and run in your browser. OR
Clicking on this paragraph will execute single click handler!
Click on this paragraph will not execute event handler.
The following example is just like the above example except we used a <div> element rather a paragraph for the click event demo.
As you click on the first div with id = ‘Clickme’, the jQuery triggers the click handler that will show an alert by using the click jQuery method.
Following example shows how to use HTML button with the click event. As you click on the button, an alert will be shown by using the jQuery click method.
The jQuery keypress event is triggered after a key is pressed in the keyboard. The keypress method will be used to perform any action or run a function as the keypress event occurs in your web document.
The keypress event occurs when a key is pressed down, so it is quite similar to the keydown event. However, there are differences between the two – for example pressing a few keys will trigger only the keydown event like ALT, CTRL, ESC etc.
$(selector).keypress(function)
Where the function is optional to execute as the keypress event occurs.
The example below shows as a key (in your keyboard) is pressed, and keypress event occurs. The keypress method will capture the event and throw an alert with ASCII value of the pressed key.
The keyup event is triggered after a key is released in the keyboard. The jQuery keyup method will be used to perform any action or run a function as the keyup event occurs in your web document.
The function is optional in the keyup method.
The example below shows as a key is released and the keyup event occurs the jQuery $.keyup() method will capture the event and throw an alert with ASCII value of the pressed key.
In HTML form elements, when the value of an element like textbox, dropdown, text area etc. is changed the change event occurs. The jQuery change() method is used to perform some action or attach an event handler to the change event.
Following is the syntax and example of using the change event.
$(selector).change(function)
e.g.
$(“txtbox”).change(function)
Where the function is optional in the change method that executes as the change event happens.
Note that, the change event only works with the form’s elements. For the text boxes and text area, it occurs when focus is changed to some other elements after any changes.
In the following example, as you enter some text into the textbox namely, Enter text, and then press the Tab key from keyboard to move to the next text field, the change event will happen and jQuery change method will be used to display an alert.
Enter some text in first field then either press Tab key or click somewhere else on page!
The load method, which is deprecated in 1.8 version of the jQuery library, was used to perform actions as the load event occurred.
The load event happens when a specified element like images, iframes, frames scripts or window document loads completely.
The jQuery load method becomes challenging, especially in the case of images loading as it comes to compatibility of the browsers. When execution of functions is also attached to load jQuery method. For example, if images are already in the cache it may cease to execute.
This chapter explains about jQuery document load method with examples, let us first look at the syntax:
$(selector).load(function)
e.g.
$(“image”).load(function)
$(“window”).load(function)
In the following example, the load event of the image will trigger an alert, showing the image is loaded by using the load method.
This example will display an alert when the whole document is loaded, including all images and other content of the web page by using jQuery window load method.
In modern websites, we usually see as the mouse pointer is moved (hover) to the links or sometimes in content paragraphs or images, the color of the link changes or some other effects in images or paragraphs. This can be done in different ways, generally the jQuery hover method is used for this purpose.
The hover method attaches or binds one or two event handlers or functions to the specified elements (like links, divs, paragraphs, images etc). These handlers or functions execute as the mouse pointer enters or leaves the specified/matched elements.
Following is the syntax of hover jQuery method:
$(element).hover(handlerInFunction, handlerOutFunction)
Where:
handlerInFunction: Required. This function will execute in jQuery on hover, as the mouse pointer enters the specified element.
handlerOutFunction: Optional. This handler or function will execute as the mouse leaves the element.
If only one handler is given in hover method, it will execute for both mouseenter and mouseleave events.
e.g.$(“p”).hover(handlerInFunction, handlerOutFunction)
$(“div”).hover(handlerInFunction, handlerOutFunction)
The example below shows how to use the hover jQuery method. In the example, as the mouse pointer enters the link area, the color of the link changes along with the text in the paragraph.
As the mouse pointer leaves the link area, the color will again change with the change of text as well, on hover method.
Mouse is entered the link!
Mouse pointer is out of link!
As working with jQuery in your web pages for different elements, it becomes quite useful if CSS can be applied or changed dynamically for different elements. For example, showing an element by using jQuery .show method and changing its CSS.
Similarly, new elements added dynamically by using jQuery and you want to apply CSS by using jQuery as well. An element made hidden by using display: none property of CSS in the stylesheet and you want to make it visible and so on.
jQuery comes up with $.css method that can be used to change/apply CSS to specified element(s) as well as return style properties for the given elements.
This tutorial explains the “CSS” method of jQuery, let us first look at the syntax of using it.
selector.css(“css_property”,”property_value”);
You can also apply multiple CSS properties by using the following syntax:
selector.css({“css_property”:”property_value”, “css_property”:”property_value”,……})
Where,
The example below applies CSS to a paragraph. This will only set the color of the paragraph text.
Click here to apply single CSS property by using jquery
The example below applies CSS properties to a paragraph. As you click on the paragraph text, the color, font size, border color, border style of the paragraph are applied CSS properties.
Click here to apply multiple CSS property by using jquery
The example below sets the background image of the paragraph element by using jQuery css method, as you click on the paragraph text.
Click here to set background image of paragraph by using jquery
The example below uses css jQuery method to display a paragraph element that was hidden by using the display: none; in CSS, as the web page loads.
As you click on the other paragraph text, it will execute jQuery css method and apply display: initial; value and paragraph will be displayed.
Paragraph display set to be initial by jquery css method.
Click here to display hidden paragraph
As shown in the above examples, you can use the .css method of jQuery to apply CSS to the specified elements. The example of using border, background, color, font-size are shown. Similarly, you can use other properties like CSS text, CSS margin, CSS padding, CSS hover, CSS visibility etc. by using the $.css method of jQuery.
In order to place or set HTML content by using jQuery to the specified elements in a web page, the jQuery comes up with $.html method.
This method is used to retrieve or get the content of the first matched element or replace or set the content of all the matched elements. The content may be HTML formatted.
In this chapter, we will cover both aspects, getting and setting the content of elements by using $.html method with examples.
You can use $.html method of jQuery to get the content of specified elements. The method will return only first matched element’s content if there are multiple occurrences.
For example, if you have two or three paragraphs with text information, calling html method will return only first paragraph’s content.
Syntax to get content:$(“element”).html()
Note that, this will return HTML code, not the formatted text. The example below makes it clearer.
The example below shows how to use the HTML method to get specified element content. In this example, two paragraphs with same IDs are used with different content. As you click on the button “jQuery HTML”, it will display an alert showing first paragraph content.
As mentioned earlier, only the first paragraph’s content will be shown if there are multiple matches.
Paragraph 1 with a link
Paragraph 2
You can use $.html method to set or add HTML content to the specified elements. Unlike using the HTML method to get content, setting HTML will affect all matched elements.
Note that, the content will be replaced for all matched elements.
Syntax to set content$(“element”).html(“HTML_Content”);
For example, if you have two paragraphs and you set the content by $.html method, it will replace the given content with existing content. The example shows how.
The example below shows how to set content to the given elements. Two paragraphs has different content. As the button “jQuery HTML” is clicked, the HTML jQuery method will replace existing content with the given content.
Paragraph 1 with a link
Paragraph 2
As you can see, both paragraphs text is replaced. You can change only single paragraph’s content if you call it by ID, as such you should have differents IDs for different elements.
Note: the $.html method replaces the existing content, you can also use jQuery append method to add text at the end of existing content or jQuery prepend method to add content at the beginning of the existing content.
The example below shows how to add HTML heading (h1) and hyperlinks by using html method.
Click above button to see heading and link example!
In many scenarios, you may need to add content, some plain text, HTML text or other elements to your web page without reloading.
jQuery makes it quite easier by way of few methods that allow to add content in the web pages. The placement of content can also be controlled easily, depending on jQuery method you are using to add content.
The append method adds content to the end of a given element. For example:
p.append(“content”) will add content to the end of paragraphs in the document.
2- $.prependThe prepend method, as opposed to append method, adds content at the beginning of the specified element. For example:
p.append(“content”) will add content at the beginning of paragraphs in the document.
This chapter only explains how to use append jQuery method with examples. First of all syntax of using append() method in jQuery. To learn prepend method: Go here
selector.append(“content to be added”);
Where selector can be an element where you want to add content. To learn more about jQuery selectors go here.
In the example below, we will show you how to add simple text at the end of a paragraph. As you click on the button “Add content”, it will add given plain text attached to the click event of the button to end of the paragraph.
Paragraph where content will insert!
Similarly, you can add content that contains HTML tags by using append method. For example, it can contain <b> tag, hyperlinks <a>, etc.
The example below adds bold text and a link as you click on the “Add content” button.
Paragraph where content will insert!
In this example, new div elements are created by using jQuery append method. As you click on the “Add content” button, new div element at the body level will be created. In order to stand out each div element, style is applied by using the CSS border.
The jQuery after method allows adding the content after the specified element.
For example, you have a div or paragraph in your web page and want to add some text content after the div or paragraph, you can use the after method of jQuery to do that.
You can also use the append method of jQuery to accomplish that, however, there is a difference explained at the bottom part of this tutorial with an example.
$(“element”).after(“Content to be added can be in bold with linebreaks
etc.”);
The example below shows how to use the after method with div element to add some text. The added text will have some formatting like bold and line break as well. You can add links or other HTML tags as well.
The jQuery after method adds content “after” the boundary of specified element. Whereas append method adds the content within the boundary of the given element. The example below makes it clearer.
We have two buttons and two div elements.
As you click on the left button “Run after method”, it will add text by using “after jQuery method”.
As you click on the right button “Run append method”, it will add content by using append method of jQuery.
To make it clearer, both div elements are given borders.
As you can see, the content added by using the after method added content after the border of div element whereas jQuery append method added within the border of the div element.
jQuery comes up with a few methods that can be used to remove elements from your web documents. You can remove the complete element including parent and child at one call or just child elements as well.
For example, you want to remove a paragraph, a div element or text box etc. from a web document.
One of the methods that can be used to delete elements is jQuery remove method. The remove method will delete all elements including parent and child. If matched elements are more than one, all elements will be removed while using the remove method.
For example, you have two div elements in your page. If you remove div by using $(“div”).remove(), it will remove both divs even if both have different ids. To remove a specific one, use id or class to remove a specific element.
In this tutorial, we will show you how to use the remove method for different elements, but let us first look at the syntax of jQuery remove method.
$(“element”).remove();
You can see, there are two div elements in the above example. The div element with id = divtst will be removed.
What would happen if we simply used the “div” rather calling it by id? See the following example.
In the following example, we will remove multiple div elements by a single call. As you click on the button “Run Remove Method” it will remove div elements by using “div” rather div by id.
The parent method traverses just one level up and searches the parent of the specified element.
Consider this structure in DOM:
Paragraph text here span content here
In that case, the div is a parent, p is the child of div while the span is a child of p and grandchild of the div element. If you specify <span> element in jQuery parent method, it will get <p> as the parent of span element! That is, the parent method will travel just one level up and get the parent of specified element.
Similarly, if you specify <p> in the parent method, it will get the div element as the parent of <p> in above structure.
This tutorial explains only about parent method of jQuery. You can see examples below but let us first look at the basic syntax of the $.parent method.
$(“child_element”).parent();
Where a child element can be a selector, an element like span, paragraph, div etc.
In this example, we have three levels; the first level is parent div while the second level is a paragraph within the div. The third level is a span element which is the child of the paragraph while grandchild of div.
The parent method will specify span element that will get parent (paragraph in that case) and add text ahead of this parent paragraph by using the after method. See below:
This is child paragraph of Div
This is span, child of paragraph and grandchild of div
You can see, as you click the button it finds span parent which is a paragraph and adds some text content “some test text”.
In this example, we will specify paragraph in jQuery parent method that will get parent (div) and adds some CSS by using addClass method. See demo below:
This is child paragraph of Div
This is span, child of paragraph and grandchild of div
Unlike jQuery .parent method, the .parents method traverse all levels up to find “parents” of specified element whereas .parent method travels just one level up.
To understand that, consider this structure:
Child of div child of p and grandchild of div
In that case, the div is a parent, p is a child of div while the span is the child of p and grandchild of the div element.
If you specify <span> element in jQuery parents method, it will travel through upper levels, to <p>, <div> to <HTML>.
$(“child_element”).parents();
See the following section of $.parents method exampls.
In this example, we used jQuery parents method and specified the span element, which is the grandchild of div1.
As you click the button “Run parents method” it will not only add CSS to <p> and <div> but also travels through HTML that adds CSS to other elements as well.
This is child paragraph of Div
This is span, child of paragraph and grandchild of div
This is child paragraph of Div
This is span, child of paragraph and grandchild of div
You can apply a filter to specify which parent level to go as using the $.parents method. In above example, as we did not specify any parent so the CSS was added across.
This is child paragraph of Div
This is span, child of paragraph and grandchild of div
This is child paragraph of Div
This is span, child of paragraph and grandchild of div
The children method is used to return the first level child of the specified element. This method searches only to the first level downward. In order to find all descendant elements, you can use the jQuery find method.
To make it clearer, consider the following simple structure:some text some text
In that case, the <p> is child of div element while <span> is grandchild or second level child of div element.
In the above structure, if you specify the div element while using the children method, it will search the paragraph only. Similarly, if you specify the paragraph it will find span element, which is the child of the paragraph.
$(“parent”).children(“child”);
Where parent element can be a selector like a div, paragraph etc.
In the section below, we will show you examples of using the children method. We will use jQuery children method to change the first-level child element presentation.
In the following example, a div is a parent element of a paragraph. As you click on the button, it will add text at the end of the paragraph.
This is child paragraph of Div
This is span, child of paragraph and grand child of div
First we searched the first level child of div element by using the children method and then jQuery after method is used to add text.
The example below adds CSS by using children method of jQuery.
This is child paragraph of Div
This is span, child of paragraph and grand child of div
If you use <span> element rather <p> in the above example, it will not work. In order to impact all descendant elements use jQuery find method.
To go upwards, from child to parent level use jQuery parents method.
In this example, as we have a button which is the child of paragraph and grandchild of the div element. As you click on button “Run children method” it will add class to the button element.
This is child paragraph of Div
The find method is used to “search” the specified element/selector to return downward descendant elements. Where a descendant can be the first level child, second level, third level and so on.
Alternatively, you can say jQuery find method returns the child, grandchild, the great-grandchild and so on elements of the specified parent element.
For example you have a <div> element structure as follows:some text some text
In that case, the <p> is a child of div element while <span> is the grandchild or second level child of the div element.
You can use the find jQuery method to search/traverse through, by specifying div and perform some desired action(s) like changing the presentation of child element; adding some CSS, changing color, making button disabled/enabled, show/hide text boxes without reloading the web page etc.
In this guide, we will show you how to use the find method of jQuery along with online examples, but first let us look at the general syntax of find method.
$(“parent”).find(“child”);
Where the parent element can be a selector, an element etc.
In the following section, we will show you examples of using find method. We will use the find method to change first or other level child element presentation. Find by id or class and changing attributes etc.
The example below uses the find method to add text at the end of the paragraph. A div element, which is a parent, has one paragraph (child) and the paragraph has a span child.
As you click on the button, it will add text at the end of the paragraph where we used the after method of jQuery with find method.
This is child paragraph of Div
This is span, child of paragraph and grand child of div
The example below adds CSS by using find method of jQuery. As you click on “Run find method” button, the span (grandchild of div) element’s CSS will be added. A solid border line will be added by using the find method.
Note that, the find method can go to any level of the parent, whereas if you need to work at first level only you should use jQuery .children method.
This is child paragraph of Div
This is span, child of paragraph and grand child of div
You can also specify class name in jQuery find method. The example below uses div parent element and find class name “testfind”, which is used in the span element. Then we used jQuery CSS method to add CSS.
As you click on the “Run find method” button, the border will be placed around the span element by using find method.
This is child paragraph of Div
This is span, child of paragraph and grand child of div
You can also specify the id in find jQuery method. The example below uses div parent element and find by id “testid”, which is used in the span element.
As you click on the “Run find method” button, the border will be placed around the span element by using find along with CSS method of jQuery.
This is child paragraph of Div
This is span, child of paragraph and grand child of div
You can also specify the name attribute in find method. In the example below, as you click on the button “Run find method”, the color of the text of another button which is the grandchild of div will be changed by using the name attribute.
This is child paragraph of Div
You load a website and you see something. You click on a button — maybe "next page" to change the result set — and it loads new data, but the page didn't refresh. This happened thanks to AJAX.
Let's look at a real-life example. Go to google.com and search for "dogs" — see how the search results appear instantly, and they even change when you alter the search? That data got pulled in "on-demand," and that's what AJAX is. AJAX relies on both JavaScript and HTTP, and it's good to understand both in order to completely grasp AJAX.
What you see when you browse a page is not just one big object. It's actually made up of multiple pieces that are pulled together behind the scenes, in several different HTTP requests. This video gives a good overview of HTTP.
HTTP is like an annoying kid that always has something to say back to you. We make requests like "I want the search results for the 'dog' keyword." Every request has a response; if everything went OK, we would get back an HTTP Status code of 200, or HTTP/1.1 200 OK. If something went wrong, it usually returns one of several errors in the 400s and 500s, depending on the problem. Every request includes the data that we send along with additional information, contained in header fields, describing what we want and how we want it. The same goes for the response.
HTTP uses verbs to describe actions like getting, creating, updating, and deleting. The POST verb is usually used to create resources, and that's the one we'll use in our example.
There are several tools that will allow you to see all of the individual requests, and most can be added to your web browser or already come built right in.
Firefox includes the built-in Firefox Inspector, which you can access with the shortcut Alt+Command+Q or Control+Alt+Q. HTTP requests appear under the Network tab. There's also Firebug for Firefox — which you can download here — and open using the fn+F12 or F12 shortcut; HTTP requests can be found in the Net tab.
Safari, Chrome, and Internet Explorer also have built-in developer toolbars. Both Chrome and IE have a Network tab, while requests are shown under Safari's Timelines tab. We'll be using the Firefox Inspector, which by default shows every request including JavaScript, CSS, Images, and XHR. The inspector only shows requests made while it's open, so you'll need to refresh the page to capture them the first time.
No. You won't be suffering from a venereal disease, I promise. Browsers use a special JavaScript object called the XMLHttpRequest to make HTTP requests in the background. You can think of it as your personal assistant that gets things for you and puts them where they're supposed to be once you give them instructions. With jQuery you don't have to worry about learning how to use this object, because the framework has taken care of all of the nitty-gritty details for you.
If you know how to put together the pieces, you'll be able to handle any AJAX situation. You could hop into another framework like Dojo, or even understand the AJAX parts of AngularJS.
Just as the HTML page from our mental model above was a single GET request, we could do the same with other types of requests. We could modify data on our server using POST, PUT, PATCH or DELETE, for example.
So let's get our hands dirty. Here's our HTML5 and jQuery:
Let's break down the not-so-clear parts of the $.ajax() method. The dataType setting controls how data we receive from the server is treated. So if we want JSON from the server to be treated as text in our Javascript on the client side, for example, then we set this value as text. If we don't set the dataType value at all, jQuery will try to figure out what the server sent and convert it intelligently. If it thinks it's JSON, it'll turn it into a JavaScript object; if it thinks it XML it'll turn it into a native XMLDocument JavaScript object, and so on.
Next up is type, which is the HTTP verb that we want to use. I'll let you in on a little secret: since jQuery 1.9.0, you can use method instead of type. It could make things a little bit clearer for newcomers.
Following type is contentType. This is where understanding how HTTP requests and responses work helps a lot. What we set here gets sent as part of the HTTP header field Content-Type. That's important to note because we're letting the server know ahead of time what type of content we're sending, which allows the server to interpret the response correctly. For example, if you see a Content-Type of application/json you would know to process the content as JSON in your server-side code — it's as simple as that.
Now, the data setting is the data we're going to send to the server. We can send data to the server in a variety of different formats, but the default is application/x-www-form-urlencoded. That means we'll be sending text to our server with our form data formatted in key-value pairs, like first-name=John&last-name=Doe. Most, if not all, web server languages will pick up the key-value pairs and separate them for you either natively or through the use of libraries or frameworks.
Let's look at some working samples of forms using AJAX POST methods in a variety of ways, and others presenting some common problems. Note that each form below is contained within an iFrame, so you can use your developer toolbar to look under the hood and see how each change affects what you see in the console and what is returned by the server.
When everything looks fine and your form still doesn't work, trying to solve the problem can get very aggravating, very quickly. Here are some common issues along with their fixes.
Your JavaScript is fine, but there's a problem with the server handling your AJAX request. Check the specific request in the Network tab of your developer toolbar to see what's going on. Pay close attention to your request Content-Type and the data you sent. For Firebug, it's labeled "Source" under the Post tab for the request. Also pay attention to the HTTP status code and any error messages; some developer toolbars will color requests with HTTP status codes of 400 or 500 in red to denote that something went wrong on the server side.
Sometimes nothing is working because you have a JavaScript error. These are easy to figure out — just look at your Console tab. The error will be there along with the filename and line number.
This could be one of several issues, but the most common problems are logic errors and typos. Check to make sure that you've used the right selectors in your jQuery, that your HTML is valid, and that you haven't mistakenly introduced a typo in your HTML or JavaScript. If you're loading JavaScript from an external file, make sure it's getting loaded into the browser. Double check the URL path.
If you're trying to POST, url looks fine, and you know the server-side code works, double check to see if url is pointing to a domain that's different from the domain that the JavaScript is loaded from. This also applies if you're trying to make an AJAX POST from the, but your page is non-secure (http://) and you're trying to load it from the secure site (https://) and vice-versa.
I challenge you to break the examples I've given and try to fix them. At the same time use your browser's developer toolbar to gain more insight. It's the best way to learn the topic thoroughly.
Any thoughts or questions? If you’re still having trouble wrapping your head around AJAX POST or if you're stumped by a problem in your code, I’d be glad to jump on an AirPair session and help you work through it.
Bootstrap
The twitter Bootstrap is one of the most popular front-end web development framework that was created at a company, Twitter Inc, by @mdo and @fat in the mid-2010. The Bootstrap framework is for web designers and developers, that makes the website development process quite easier, reduces development time and it is powerful.
The Bootstrap framework is for all skill levels – beginners with a basic knowledge of HTML and CSS, designers (who are more expert in designing the websites and less in development) and web developers, who are expert in the server side scripting.
The Bootstrap framework is mobile first, responsive i.e. it adapts the “shape” of the device where your website visitor is visiting the website. As such you should expect visitors from any operating system and different devices – from different resolutions of desktop screens to tablets to different sizes smartphones or mobile phones. The Bootstrap makes your website adjust according to the user’s screen so that your visitors won’t see early days ugly scroll bars in the mobile/smart phones and run away immediately. Or otherwise, you had to write different codes for different devices in order to make it more readable, with different navigation etc. Bootstrap enables you to write you just one code that is scaled to any device or screen size.
The Bootstrap framework is the mobile first is really an important point. Historically, just a few years back, the first thing in the minds of developers and designers were desktop or big screen version of the websites. Though, the mobile end was also in mind but it was a secondary phase, generally. However due to the fact of fast grown and still growing mobile industry with over 1.2 Billion mobile web users worldwide and growing, where around 25% of web users are mobile only in the US and over 10 billion times mobile applications are downloaded; mobile first makes Bootstrap framework even more attractive. This feature is included in the Version 3 of Bootstrap as part of the default CSS. The earlier version had to use another CSS part to achieve responsiveness.
Bootstrap is an open source project. This is now hosted in GitHub that can be located here:
The Bootstrap was basically served as the Twitter Blueprint. It was created by a Twitter’s designer and a developer in the mid-2010 before it became an open source framework. Within the company (Twitter), Bootstrap served as the styles guide for internal tools development and still doing so.
Twitter Bootstrap has two major rewrites, V2, and V3 while it had over twenty releases, since the original release, back in Aug 2011.
As this project was developed by the company, Twitter, generally Bootstrap started referred to as Twitter Bootstrap. While the company states this should simply be referred to as Bootstrap with “B” as capital.
Bootstrap framework uses HTML 5 and CSS along with the JavaScript/jQuery. Bootstrap comes up with the 12-grid system to work with the responsive layouts. It provides commonly used components in the websites like Buttons, Forms, Tables, Dropdowns, Alerts, Carousel, Navigation, Responsive images, Typography, Glyph-icons, etc. It also provides JavaScript components/plugins like Modals, Dropdowns, ScrollSpy, Tooltips, Popovers, Alert Messages, Buttons, Collapse etc.
You will find using these CSS features or JavaScript components with examples in this tutorial.
Before you go to the next chapters, here is a basic Bootstrap based theme where you can see how easy it is to create a website using Bootstrap framework. It will show commonly used components found in different websites. You can also experience proceedings online by clicking at “Experience it online” or can copy paste to your local system to see it at your local machine.
The target is to create a website landing page with a navigation (menu) on the top followed by a carousel. After that, we will create four “columns”. Two columns with information, one with a sign-up form and the right most with another navigation to other web pages. Finally, we will place a footer with the copyright info.
First of all, download the Bootstrap framework from the official website:
At this stage, I will recommend downloading Simple Bootstrap for this demo which is a compiled and minified CSS, JavaScript, and Font. This is the minimum requirement for your website in the Live mode as well. Download and unzip it. The file structure including our index.html demo file (explained in the next section) should look like this:
Open your text editor and create an index.html file.
The first line of code will be <doctype> declaration. As Bootstrap is based at HTML 5, we will declare it by using HTML 5 declaration as follows:
Include Bootstrap library
In order to use Bootstrap framework’s CSS, its components or JavaScript you have to include some files in your web pages as follows:
Including CSS in the <head> section:
Including jQuery and bootstrap.js in the <body> section just before </body> closing tag as follows:
The code until now will look like this, including the title:
The next step is to create a container, which is a main div that will contain the whole web page. We will use container CSS class in the main div element. Next is an <h3> heading that will appear on the top followed by the menu bar or navigation bar. First, have a look at the code and output then I will explain what we have done!
Just paste this code after opening <body> tag, if you are doing this in your local system:
As you can see, the <h3> will show main title of the page that appears above the menu bar. Below that navigation bar is started by:
The <nav> is an HTML 5 tag that is assigned to navbar and navbar-default CSS classes from the framework.
After that, we have a <div> container that contains navigation bar. Our demo navigation contains a few links and a dropdown with “products”. A small form with site search facility is also there by using the Bootstrap’s form.
Next section is creating the carousel with three images sliding. You can see sliding images with proceedings online by clicking “Experience this online” below or copy and paste if you are doing it at your local machine. You have to place the images in the “images” folder at the same location where the “index” file is created.
Example Text Here for features, product or service etc! Example Text Here for features, product or service etc Example Text Here for features, product or service etc Example Text Here for features, product or service etc Example Text Here for features, product or service etc
To properly differentiate the section, we have added <hr/> tag to add horizontal lines.
And finally another <hr/> followed by the footer section, by using the “footer” class in the div element.
Bootstrap framework includes the base CSS and HTML that can be used in the website design for different components. These includes Typography like headings, page headers, paragraphs, text formatting etc, tables, forms, button navigation, grids etc.
By including the Bootstrap CSS library, you can refer CSS classes provided by the Bootstrap in your web documents. This tutorial will take you through CSS library of Bootstrap for different components along with online examples and code to show you how it works.
First of all, you have to place Bootstrap’s CSS file in the <head> section of your document before using the CSS classes. The basic code to be included in any web page is for CSS framework:
Where is for HTML 5 declaration. Note that, the Bootstrap requires using the HTML 5 declaration.
The following line
includes Bootstrap CSS into the web page, provided web page is located outside of CSS folder.
You can use HTML headings, from <h1> to <h6> as usual while working with Bootstrap framework. See example below for <h1> to <h6> headings.
The font size from .h1 to .h6 are kept 36px, 30px, 24px, 18px, 14px and 12px respectively. While the font-weight is semibold.
You can change the color by using style attribute of HTML in the headings or may add your own CSS.
The default font size of the body text is kept 14px. The line-height is 1.428. Let us show this by using the <p> tag with some text.
This is some example text! This is example text! This is some example text! This is example text! This is some example text! This is example text! This is some example text! This is example text! This is some example text! This is example text! This is some example text! This is example text!
Following example shows how to create an ordered (numbered and alphabetic) and unordered lists under the Bootstrap framework.
Bootstrap framework also provides classes for tables in your web pages. You may use cool styles and effects in the table by using those classes. A few CSS classes provided are: .table-striped (for stripped rows) .table-bordered (for bordered table) .table-hover (with hover rows) To learn more about tables go to its chapter here: Bootstrap CSS Tables CSS For
The following example uses the .table class of Bootstrap CSS to create a table. The created table is without the borders.
Employee Name | Emplyee Salary |
---|---|
Mike | $5000 |
Dave | $6000 |
Shena | $4000 |
As you can see online, a table is created without the borders around a table and its rows. The headings are bold while table data is left aligned.
Following example uses the table-striped class to create the stripped rows in a table.
Employee Name | Emplyee Salary |
---|---|
Mike | $5000 |
Dave | $6000 |
Shena | $4000 |
You can see, the first row’s background is light grey and the next is white. The next row is light grey and so on. The rows are styled by the :nth-child CSS selector, which is not compatible with IE 8. So if you have no issue with older browsers then you can simply use this class. And look how simple it is to create a beautiful stripped table with Bootstrap framework.
Following example creates a bordered table using the same data as in the above examples by using the .table-bordered class.
Employee Name | Emplyee Salary |
---|---|
Mike | $5000 |
Dave | $6000 |
Shena | $4000 |
As mouse comes over a row in a table, the background color will change. This style looks nice and especially for long tables it enables users to differentiate the ‘seen’ rows to the others in a table. You can create hover rows by using the .table-hover class. Look at an example below that shows how easy it is to create a hover style table.
Employee Name | Emplyee Salary |
---|---|
Mike | $5000 |
Dave | $6000 |
Shena | $4000 |
You can also add table-bordered in the <table> tag to add the border in hovered style. See example below:
Employee Name | Emplyee Salary |
---|---|
Mike | $5000 |
Dave | $6000 |
Shena | $4000 |
You can see, a table with hover rows and a border is created by using table classes of Bootstrap framework.
In the above example, we have seen how to apply Bootstrap CSS classes to the table tag. You can also apply classes to individual rows or even table data elements in your web pages. For example showing a row as “active”. Following are a few examples of using the CSS classes in the rows.
The following example uses success, active, info classes in a table with a border. The rows can be differentiated by different colors.
Employee Name | Emplyee Salary |
---|---|
Mike | $5000 |
Dave | $6000 |
Shena | $4000 |
Shaun | $5000 |
Ben | $3500 |
Note that, names in the table are just for illustration purpose.
You can also use these classes in
Employee Name | Emplyee Salary |
---|---|
Mike | $5000 |
Dave | $6000 |
Shena | $4000 |
Shaun | $5000 |
Ben | $3500* |
As such, Bootstrap framework is mobile first; how come Bootstrap tables cannot be responsive! As the screen gets smaller, the behavior of a table also changes to give the best user experience. If you simply use the above examples in smaller devices like under 300* resolution, the horizontal bar comes in at the browser level. To make the user experience much better, you can wrap table into .table-responsive.
You can simply create a div above the table and wrap that table into the table-responsive class. If the screen resolution is less than 768px then the table will scroll horizontally. Following example shows how to use it:
Employee Name | Emplyee Salary | Emplyee Age |
---|---|---|
Mike | $5000 | 45 |
Dave | $6000 | 35 |
Shena | $4000 | 27 |
Shaun | $5000 | 32 |